Saturday, December 31, 2011

Top 10 Blogger's DIY of 2011

Love Maegan D&G shoes - Inspiration&Realisation Valentino bow shirt- A pair and a spare cut out dress- Chic Steals Screen print skirt Honestly wtf Dolce&Gabbana pasta earrings


Desdenerife con amor Glitter shoes - Keith Haring shirt by Outsapop - Clear cuffs by Love Aesthetics - Farabella bag by Feed your Style - Rodarde Boots by Disarming Darling

Today I would like to wish you a happy new year and share with you my top 10 blogger's diy of 2011 ,all prjects that wowed me and inspired me. I hope you enjoyed reading this blog during this year, expect even more diy projects for the next one. Which have been your favorite diy projects of 2011? Which inspired you the most?

And what about this page? Below I'll show you some of my favorite projects,(yes I know,mostly shoes, guilty!) what is your favorite? Share your thougths!
Thanks for reading this page and for your sweet comments!
HAPPY NEW (crafty) YEAR!

Oggi vorrei augurarvi un felice 2012 e condividere con voi quelli che a mio avviso sono stati i progetti diy più belli del web, quelli che mi hanno più colpito e ispirato. Spero che questo blog sia riuscito ad intrattenervi durante questo 2011, se si attendetevi ancora più idee per il 2012. Quali sono stati i vostri diy preferiti in assoluto?

E invece quali  vi sono piaciuti di più in questa pagina? Di seguito troverete i link ai progetti che io preferisco (lo so! Quasi tutte scarpe!).
Grazie per aver letto questo blog e per tutti i vostri simpatici commenti, Auguro un Buon Anno (creativo) a tutti!

how to fix a broken eyeshadow - Zara asymmetric shoes - glitter shoes DIY - studded shoes DIY

Friday, December 30, 2011

Fluffy feathers shoes DIY

alexander wang fluffy shoes, alexander wang diy,fluffy shoes diy,feather shoes diy,wedding shoes diy,marras diy,spring shoes diy,pin on decorations,diy shoes

alexander wang fluffy shoes,alexander wang fall 2011,antonio marras spring 2012 shoes,fluffy shoes 2012 spring
the inspiration Alexander Wang heels fall 2011 - Antonio Marras spring 2012

Last summer we talked about the fluffy shoes designed by Alexander Wang for fall 2011 asking if they were wearable or not. We both agreed that they were very dramatic. If you tried to forget about them i'll tell you: the trend of the fluffy shoes is here to stay; in fact during the latest Milano fashion week (read my report of Milano fashion week here) a sassy, fluffy detail appeared again on shoes in the Antonio Marras spring 2012 collection. Feathers are not suitable for daily wear but they can make special a pair of shoes for a evening (maybe new year's eve?), so what if they were detachable? In this fashion diy you'll see how to create a detachable feather clip decoration that can be added on top of your shoes. Since it is detachable it can decorate wedding shoes, an headband, it can be used as a brooch, as a ring, you can pin it wherever you like! You can give a new look to your shoes in minutes! What do you think of the result?


Le scarpe disegnate da Alexander Wang, sono di quelle che dividono le donne in due gruppi: quelle che le amano e quelle che le odiano. Se pensavate che fosse un trend da archiviare vi informo che le scarpe "pelose" sono comparse nelle ultime sfilate di Milano nella collezione di Antonio Marras. Tutte concordiamo siano molto sceniche e magari poco adatte ad essere indossate tutti i giorni, magari solo per una serata speciale (magari proprio Capodanno?). E se fossero rimuovibili? Nel fai-da-te di oggi vi mostrerò come realizzare una decorazione in piume rimuovibile che può essere inserita sulle scarpe. Essendo rimuovibile questa decorazione può essere appuntata su cerchietti,giacche,anelli, dovunque vogliate. Sono necessari pochi step per donare un nuovo look alle vostre scarpe, che ne pensate?

Thursday, December 29, 2011

Space trainers

mihara yasuhiro puma, metallic trainers,metallic flats, trainersmihara yasuhiro puma, metallic trainers,metallic flats, trainers
mihara yasuhiro puma, metallic trainers,metallic flats, trainers

Even if trainers are not my favorite kind of shoes I have to say these got my attention with their metallic silver color, the melted  rubber and cut out details. They're part of a Puma capsule collection designed by the japanese designer Mihara Yasuhiro.

Wednesday, December 28, 2011

My design for UGG Australia


ugg boots,ugg australia,ugg design,chic ugg,black ugg,quilted ugg boots
the croco ugg boots - McQueen blouse -  Ivory  winsor necklaceMoschino Bouclè jacket - Miss Sicily bag

A while back Ugg Australia contacted me to join their DIY contest :Art and soles and design a pair of Uggs so this is my entry. It's a black boot decorated with a crocodile quilted pattern. I chose the crocodile pattern because exotic leathers are associated with luxury and my aim was to design a boot that could be stylish with personality. I wanted to make them special with sophisticated details.
Do you like them? Would you wear them? If your answer is yes then you can support me by voting this design on talenthouse. You can make it happen, you can take these boots into the stores! I would be super thrilled to see someone buying, loving and wearing these boots!!

VOTE THIS DESIGN

Qualche tempo fa Ugg Australia mi ha contattato per invitarmi a partecipare al loro DIY contest e a disegnare un paio dei famosi stivaletti così ecco la mia proposta. E' una stivaletto nero decorato con una trapuntatura che disegna una stampa coccodrillo. Ho scelto il coccodrillo perchè le pelli esotiche sono associate all'idea di lusso ed esclusività. Il mio obiettivo era quello di disegnare uno stivaletto elegante ma con personalità impreziosito da dettagli sofisticati. Vi piacciono? Li indossereste? Se la vostra risposta è si allora potete supportare questo design votandolo su talent house. Sarete voi a portare nei negozi questi stivaletti!
Sarebbe magnifico poter avvistare questi stivaletti mentre camminano per la città!

Tuesday, December 27, 2011

Make a jewelry holder with a box of chocolates

how make jewelry holder,jewelry holder,chocolates box,diy


This is not properly a tutorial it's more a suggestion on how to recycle a box of chocolates turning it into a rings holder. The tough part comes first: you and your friends have to eat all the chocolates then you can insert all your fancy rings into the box so they are clearly on display and you can quickly choose between them.

Quello di oggi non è propriamente un tutorial è più un suggerimento su come riciclare una scatola di cioccolatini trasformandola in un porta gioielli. La parte più difficile sarà sicuramente consumare i cioccolatini ma con l'aiuto di qualche amico ce la potete fare; poi andrete a riempire la scatola con i vostri anelli o anche orecchini così saranno esposti in bella vista e potrete scegliere rapidamente quali indossare.

how make jewelry holder,jewelry holder,chocolates box,diy

Monday, December 26, 2011

How to wear sequins

asos sequin dress,sequin dress

This is the time of the year when sequins are never over the top. If you plan to wear a sparkly dress on new year's eve here are some quick tips to wear sequins with confidence without look overdone.


  1. Dose sequins wisely: If you wear a dress covered in sequins don't match sequinned accessories like bags or shoes.
    sequin shoes, sequin bag, sequin accessories,how to wear sequins
    Clutch Nordstrom Brogues :topshop. sequin shoes Lanvin, pink sequin shoes Miu Miu
  2. Skip jewelry or wear small bijoux
  3. Sequins are not only evening wear. Wear them during the day matching them with jeans and blazer sequin shoes, sequin bag, sequin accessories,how to wear sequins, how to wear sequins day,day wear
  4. Wear sparkly make up and nails. If you're too shy to wear a sequinned dress enlight your look using a sparkly manicure or glitter eyeliner
sequin make up,glitter make up,glitter eyeliner, glitter nail polish,glitter pot,how to to wear sequins
Pupa nail polish - Urban decay eyeliner  - MAC glitter pot

Le feste natalizie sono il periodo perfetto per indossare un look illuminato da paillettes. Se anche voi avete deciso di stupire con abito di strass ecco alcuni veloci consigli per non esagerare.
  1. Dosate le paillettes. Se indossate un abito in paillettes non abbinatelo ad accessori anch'essi coperti di paillettes come scarpe e borse.
  2. Non indossate gioielli o sceglieteli piccoli
  3. Le paillettes non sono solo un indumento da sera ma possono essere indossate anche il giorno sdrammatizzandole con un jeans e un blazer.
  4. Illuminate il make up. Se pensate che un abito ricoperto di paillettes sia eccessivo per il vostro stile potete illuminate il make up con smalti e eyeliner glitterati.

    Sunday, December 25, 2011

    Wednesday, December 21, 2011

    DIY idea: pom pon scarf

    pom pon scarf,pom pon tutorial,pom pon diy,sandra backlund pom pon
    colored pom pon scarf Accessorize - white pom pon scarf-top by Sandra Backlund

    During these cold days the scarf is one key accessory we cannot live without. The pom pon scarf  is cute and can be easily made at home. Anyone can do pom pons, they're a quick , no sew diy project. If you like the multi colored one pictured above you can even make a new scarf recycling yarn leftover so you'll have a new scarf for free
    Do you think a pom pon scarf is only suitable for kids? Have a look at the picture on the right where we see pom pons going high fashion in the scuptural white top by Sandra Backlund.
    So bottom line: how do we make a pom pon?

    how make pom pon,pom pon tutorial,pom pon diy
    how to make a pom pon picture via fashion crochet
    What do you need?
    carboard
    scissors
    yarn
    1. cut two discs of cardboard 3 inches wide (the width sets the dimensions of the finished pom pon)
    2. overlap the two discs
    3. wrap the yarn around the discs until they're full (the more yarn you add the fuller the pom pon will be)
    4. use the scissors and cut all loops along the edges
    5. carefully separate the discs unveiling the center of the pom pon; cut another piece of yarn and knot  all the yarns together at the center
    6. remove the discs,  and you've done
    After making several pom pons connect them using another piece of yarn and a needle, insert a pom pon after another and you've done!  
    PS: the pom pon scarf can make a nice Christmas gift!


    Durante le fredde giornate d'inverno la sciarpa è un accessorio di cui non possiamo fare a meno. La sciarpa con i pom pon è simpatica e può essere realizzata in casa. Tutti possono realizzare i pom pon, sono veloci e non richiedono alcuna cucitura. Se volete una sciarpa multicolore come quella di Accessorize potrete addirittura realizzarla riciclando gli avanzi di gomitoli che avete in casa ottenendo una nuova sciarpa completamente gratis. Se pensate che i pom pon siano adatti solo ai bambini ricredetevi guardando il top couture realizzato da Sandra Backlund. Allora, come si realizzano i pom pon?

    Avete bisogno di:
    cartone
    forbici
    lana

    1. ritagliate due dischi di cartone del diametro di 7 centimetri ( la dimensione dei dischi determinerà la dimensione finale dei pom pon)
    2. sovrapponete i due dischi
    3. avvolgete il filo intorno ai dischi fino a ricoprirli (più filo aggiungerete più pieni risulteranno i pom pon)
    4. usando le forbici ritagliate gli anelli di lana sul bordi dei dischi
    5. separate con cura i dischi scoprendo così il centro del pom pon;  tagliate un altro pezzo di filo e formate un nodo al centro bloccando tutti i fili insieme
    6. a questo punto rimuovete i dischi di cartone e il pom pon è fatto.
    Dopo aver realizzato più pom pon connetteteli prendendo ago e filo e infilandoli uno dietro l'altro e la sciarpa è pronta!

    PS: la sciarpa con i pom pon può essere un perfetto regalo di Natale!

    Tuesday, December 20, 2011

    How to Stop Your Puppy Chewing Problem

    Learning how to stop your puppy from chewing can become a difficult chore that will leave you frustrated, especially when they get ahold of your favorite pair of shoes, or they are constantly chewing on you.

    If you want to stop your puppy from chewing, there are a few things that you need to understand about them before you just blame them for their behavior.

    To begin with, chewing is a natural part of being a puppy. Rather than trying to stop them from this natural behavior, you should work towards redirecting the problem to another source. Get them chew toys and a bone thatthey are allowed to gnaw on to their hearts content.

    It is much easier to redirect a problem than to try and stop it completely, especially when the problem is more of a human problem than a puppy one.

    Another thing to consider is that certain behaviors tend to instigate chewing, especially when they are chewing on you. This can lead to dog aggression problems later on, so you need to nip it in the bud now rather than putting it off.

    But, again, this is a human problem as much as a puppy problem. In order to stop your pupply from chewing on you, you need to pay attention to what you do that instigate it.

    Certain sudden movements, or aggressive behavior towards your puppy (even in play) will push them into chewing. Also, when you are playing, if they start chewing on you, stop the activity.

    Dogs can't distinguish between play time and not play time. Although they love to play, the habits that they will pick up then will transfer to other times.

    You should never allow your dog to play aggressively and chewing is one of the easiest bad habits to break.

    When they start chewing, redirect them to one of their play toys, and separate yourself from them.

    If the chewing problem persists, you may need to keep them in a kennel until they learn to behave. Crate training can take some time, but is very beneficial in stopping a wide variety of puppy problems, including them wanting to chew on you.

    Follow these tips to stop your puppy from chewing, and get them under control. It doesn't take much, but by paying attention to your behavior and redirecting their behavior to an appropriate toy will help you to get things under control.

    Sunday, December 18, 2011

    The flapper dress DIY

    flapper dress diy,diy,free pattern,tutorial

    flapper dress diy,diy,free pattern,tutorial
    flapper dress diy,diy,free pattern,tutorial

    Christmas is approcching and we're putting together our party outfit.
    Last week we diy-ed a our glitter shoes and now it's time to diy our party dress.
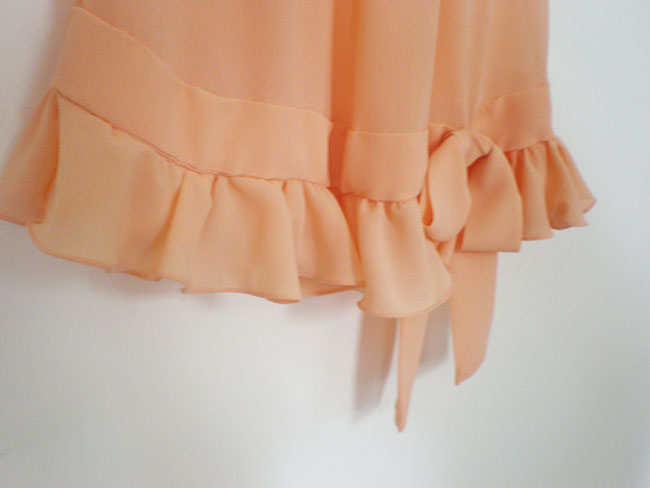
    The dress I made it's a flapper dress in a blush pink color and I used a sheer crepe georgette fabric.
    If you saw the latest runways you maybe know that the flapper dress will be really trendy next spring, so we're making a dress we can wear a lot next season. See the step by step tutorial after the jump.

     Natale si avvicina ed è tempo di mettere insieme il nostro outfit. La settimana scorsa abbiamo realizzato le scarpe, ora è il momento di cucire il vestito che ho realizzato in stile charleston scegliendo un colore rosa cipria. Se avete seguito le ultime sfilate saprete che i ruggenti anni venti stanno per tornare di gran moda la prossima primavera quindi il vestito di oggi è pronto per essere sfoggiato durante il corso della prossima stagione. Troverete il tutorial step by step di seguito. 


    spring 2012,flapper dress,gucci,etro,cavalli,alberta ferretti
    low waist flapper dresses for spring 2012: Alberta Ferretti, Etro, Roberto Cavalli, Gucci
    flapper dress pattern,flapper dress diy,diy,free pattern
    The dress is basically a tube wide as your hips; the back is made a little smaller to obtain a slimming effect, sew the two rectangles at the sides and at the shoulders leaving opened the armholes and the neckline
    Il vestito è in pratica un tubo della larghezza dei vostri fianchi, il dietro è tagliato più piccolo ottenendo un effetto snellente. Cucite i due rettangoli ai lati e sulle spalle lasciando aperte le maniche e  lo scollo.
    to wear the dress easily slash the back at the middle and add a button 
    You've now made the dress. I then added a funny ruffle at the bottom and a decorative belt
    Per indossare il vestito eseguite un taglio al centro dietro e aggiungete un bottone per richiuderlo.
    Il vestito è pronto, a questo punto ho aggiunto una ruche in fondo e una cinta decorativa.

    How to make the ruffle:

    how to make ruffles,ruffle tutorial
    I then hemmed the ruffle and then gathered it: I stitched the edge of the ruffle loosely and then I pulled the thread. You'll see ruffles forming and you'll obtain this result
    When you gather the fabric, it gets shorter so I cut 2 circles of fabric, one for the front and one for the back.
    (I also gathered the shoulders)
    Come si realizza la ruche:
    Qui sopra troverete il modello per la ruche, una volta tagliato, eseguite l'orlo e poi arricciatelo. Per realizzare l'arricciatura basterà eseguire una filza lungo il bordo della ruche e poi tirare il filo, mentre la stoffa si arriccia vedrete diventare più evidenti le ruche. Arricciando la stoffa la lunghezza della ruche necessariamente si riduce; ho quindi tagliato due cerchi di stoffa, uno per la ruche sul davanti e una per la ruche sul dietro.
    (Ho anche arricciato le spalle).


    how to make ruffles,gathering technique,how to gathering

    the ruffle sewed onto the dress
    cucite la ruche sul vestito

    How to make the belt: I cut a rectangle 10cm tall and 'hips width' long, I folded it in half and I sewed on the reverse and then I turned inside out. I then sewed onto the dress.

    Come si realizza la cinta: Ho tagliato un rettangolo di stoffa della lunghezza dei fianchi e alto 10 centimetri. L'ho piegato a metà e ho realizzato la cucitura laterale a rovescio. Ho rivoltato la stoffa a dritto e ho cucito la cinta sul vestito.


    How to make the bow: I cut another meter of fabric 10 cm tall, then I made the bow and I stitched it onto the dress.

    Come si realizza il fiocco: ho tagliato un rettangolo di stoffa alto 10 cm e lungo un metro. Ho rifinito la striscia allo stesso modo della cinta. Ho eseguito un fiocco e l'ho cucito sul vestito.

    et voilà! The dress is ready to wear!
    Et voilà! Il vestito è pronto da indossare!

    Saturday, December 17, 2011

    What's New at Urania

    What's New at Urania

    Urania is Musa's speculative fiction imprint and in a way Penumbra's parental imprint. There are many great stories of all shapes and sizes coming out with Urania over the next few weeks, and today I'd like to tell you about a couple that have just been released. Last week, on December ninth, we had two new releases, Sunset and The New West 2: Deacon's Ark. Today Urania releases Coffee for the Body, Flames for the Soul.

    Sunset, written by Jay Caselberg, is a short story of about 4, 000 words. 'In a far flung colony world, sometimes you have to survive any way you can. ' You can buy it for the lovely price of  $0.99 here.

    Deacon's Ark is a 25, 000 word science fiction novella written by A. E. Stanton.

    'The Green Goddess may be carrying the only normal people and animals left in the world -- good thing Josie and her Hero are on board.

    Josie and Deacon have left Horsetown and are back in search of The City. Joined by Josie’s youngest sister, Sadie, they decide to travel on the riverboat The Green Goddess to save travel time.

    But a plague from the Northern Wastes has been loosed on the river’s port towns. Instead of a relaxing cruise, Josie and Deacon have to protect all the people and animals on board -- because if they can’t stop the spread of the plague, they’ll be the only normal ones left in the world.'

    You can buy Deacon's Ark for $2.99 here.

    And finally, Coffee for the Body, Flames for the Soul is a short, 2, 500 word story written by Michael Merriam.

    'It came to the diner looking for a soul to devour.


    At a late-night diner, the manager finds himself faced with a nightmare from his past: The Nalusachita, a mythical-creature of his Choctaw ancestors.

    Determined to protect his customers from the shape-changing soul-stealer but unsure how, the manager sets out to clear the restaurant at closing time.

    What neither manager or monster counted on was the eccentric patrons of the diner, and how they would react to the mythical creature…'

    You can buy Coffee for the Body, Flames for the Soul for $0.99 here.

    Go ahead and treat yourself to some holiday reading this winter season. I know I will be.

    How To Keep Your Dog Cool In The Summer

    Summer is a time for fun - swimming, picnics, baseball games, and playing with your dog in your newly mowed lawn. The only downside to summer is the heat! For us humans it's easy to keep a tall glass of lemonade around or crank the air conditioning up to keep us cool during these months.

    But our pets don't often have it so easy. It can be miserable for your dog to be stuck in the heat for long periods of time with no way to keep cool. While it's obviously preferable to keep your best friend indoors when the weather gets hot, sometimes it's not practical.

    If you absolutely have to keep your dog outside during these hot months, then there are a few simple things you can do to keep your dog safe and cool. You DON'T want to forget these tips - they are absolutely essential.

    First off, make sure your dog has plenty of shade. You can build a simple pavilion out of scrap wood and a tarp if there is no other shade source. Shade can make a big difference!

    Also, make sure your dog has lots of cool water. They make great water bowls now that can be hooked up to a hose and that continually refills the bowl when the water level drops below a certain point. It's great because your dog will never run out of cool water!

    Another super way to keep your dog cool is to give him access to a kiddie pool filled with water, but this is only for dogs that like the water and are able to swim. Remember: safety first! Don't do this if you have a small, short-legged dog that could drown in the pool.

    Finally, and one of the best ways to keep your pet cool during the summer, you can get your dog a cooling dog bed (also known as a dog cooling mat).

    The cooling dog bed (or dog cooling mat) is a great way to make sure your dog stays comfortable in that blistering summer heat. And if you are looking for a cheap dog bed, a cooling dog bed or dog cooling mat usually don't cost too much and works great besides that. They require NO electricity but simply work by dispersing the water inside the dog cooling mat when they lay down, providing a cool, dry place to sleep. They're made out of a tough nylon material as well so that claws won't puncture when the dogwalks across them. Cooling dog beds are a great way to keep your favorite pet from suffering in the hot summer sun. These dog cooling mats are also great for dogs that have just gotten back from playing outside or taking a doggie walk.

    Remember to always follow these tips when your dog is outside in the summer. In the end however, the best way to keep your dog cool is to keep him indoors when the heat is too much!

    Learn more about cooling dog beds at PetProductsForYou.com. You'll discover many different types of dog cooling mats and cooling dog beds for your pet.

    Friday, December 16, 2011

    Inspired by Nature

    ice cube necklace,Katharina Ludwig
    Katharina Ludwig real ice jewelry

    leaves cuff,leaves bracelets

    oak tree bangle  -Fern Leaf Bangle - leaf bangle - Jar earrings -


    branches necklace,twig necklace

    Alexis Bittar branch necklace - twig bracelets - twig necklace

    A few jewels inspired by nature: precious and delicate. Some of these have been realized using real leaves as molds while Katharina Ludwig jewels are surprisingly realized with real ice and will melt while wearing them. Maybe fake ice cubes could be glued on a lightweighed chain to make a similar necklace.

    PS: our crafty community reached 501 followers on blogger and almost 300 on facebook, it's good to share ideas and diy projects together, thank you for the support and  happy DIY weekend to everyone!   

    Ecco alcuni gioielli che si ispirano alla natura risultando delicati e sorprendenti. Gli stampi di alcuni sono stati ottenuti utilizzando vere foglie mentre  i gioielli di Katharina Lugwig sono sorprendentemente di vero ghiaccio e quindi sono destinati a sciogliersi mentre li si indossa. Se vi piace l'aspetto del suo collier potrete ottenerne uno simile incollando del finto ghiaccio intorno ad una catenella.

    PS: ehi, il nostro gruppo ha raggiunto i 501 followers su blogger e quasi 300 su facebook, è bello poter condividere con voi idee e tutorial, grazie per il supporto e buon weekend a tutti!

    Wednesday, December 14, 2011

    Liz Taylor necklace DIY using Christmas ornaments

    liz taylor,liz taylor jewels,jewel diy,diyliz taylor,liz taylor jewels,jewel diy,diy
    liz taylor,liz taylor jewels,jewel diy,diy

    Once Richard Burton said of her wife: 'The only word she knows in Italian is Bulgari'. Liz Taylor jewels are well known for being some of the most precious, bold and expensive ever seen. She also spoke about her passion for jewelry in the book:'My love affair with jewelry'. Her collection, called for the occasion "The crown jewels of Hollywood" just went on auction at Christies . The price of her jewels skyrocked above any prediction, proving the high added value of buying something worn buy one of the most shining stars of Hollywood.

    liz taylor,liz taylor jewelsliz taylor,liz taylor jewels


    Today's DIY is about creating a very bold necklace with very low budget, nothing comparable to Liz jewels of course, just something that that will look luxurious. You judge if the experiment was successful or not.
    The unexpected supply used are Christmas ornaments. Do you want to know how it was done?
    You'll find the tutorial fter the jump!


    Richard Burton raccontava della moglie: 'L'unica parola che conosce in italiano è Bulgari'. I gioielli di Liz Taylor sono tra i monili più costosi, vistosi e prezioni mai visti tanto da guadagnarsi l'appellativo di gioielli della corona di Hollywood. La stessa Liz ha raccontato della sua passione per i gioielli nel libro'La mia passione per i gioielli'. La sua collezione è appena andata all'asta da Christies. I gioielli sono stati venduti per cifre record, ben oltre il loro valore stimato, mostrando il grande valore acquistito dai monili solo per essere stati posseduti da una delle stelle più splendenti di Hollywood. 

     La collana che ho realizzato oggi si ispira a gioielli regali, non è certo confrontabile con quelli di Liz ma si ispira ad essi. E' stata realizzata utilizzando delle decorazioni natalizie, troverete il tutorial di seguito.


    Snowflakes ornaments on the Christmas tree
    supply: rhinestones, christmas ornaments,chains, a clasp,glue,a plastic sheet
    vi serviranno: pietre ottagonali, decorazioni natalizie color ghiaccio, una catenella,
    un moschettone, colla, un foglio di plastica


    Glue a stone at the center of the ornament
    Incollate un pietra al centro dei decori


    glue a stone on a piece of plastic sheet, make a hole at each side of the plastic
    Connect all the pieces with jump rings
    Close the necklace with a piece of chain
    add a clasp at the end

    Incollate delle pietre al centro di un pezzetto di plastica, forate entrambi i lati
    connettete gli elementi con degli anellini metallici
    chiudete la collana con una catenella
    aggiungete un moschettone come chiusura