Wednesday, June 20, 2012
How to DIY neon shoes using spray paint
The best way to add neon to our wardrobe is with accessories. Do you like neon but you're afraid to overdo? Match it with neutral tones. Today I'll show you how to renew a pair of shoes using neon spray paint. All you have to do is to mask all the parts of the shoes you don't want to be painted with paper scotch tape and then spray! If your shoes aren't white I suggest to spray them with white spray paint first so yellow will be more saturated. Are you ready to have fun? Head over Style.it for the full tutorial!
Tuesday, June 19, 2012
GET THE MOST OUT OF BETA READER FEEDBACK
By Alex Shvartsman
Every writer has an opinion about critiques. Some avoid them altogether; they trust in their ability to self-edit and prefer a submissions editor to be the first person who sees their work. I’m on the opposite end of the spectrum. I find the reactions from beta readers to be insightful, helpful, and almost addicting.
Price of Allegiance, my space opera tale in Penumbra’s July issue, benefited from several rounds of critiques. I rewrote it, changing elements of the story and fixing problems identified by my readers. Over the course of receiving feedback on this and other stories, I learned that getting the best mileage out of critiques is an important skill in itself.
A crucial thing to keep in mind when reviewing a critique is that fiction is subjective. If you let ten people read your story, you will likely end up with eleven different opinions on how to make it better. Don’t default to making changes because a particular reader was unhappy with some aspect of your story. Listen to what they have to say, but weigh it against others’ opinions and especially against your own. Striking a balance between willingness to accept advice from others and knowing when to trust your gut is a key element to getting the most from your beta readers.
In my case the most commonly ignored beta reader comments are the staples. Often well-intentioned readers will default to familiar warnings: Cut the adverbs! Avoid exposition! Only ever use “said” in dialog tags!
No great story has been told entirely without adverbs or exposition. Those elements are like salt: you need a little to cook the dish, but too much will ruin it. If you’ve advanced beyond the beginner stage as a writer then you already know this, and eliminating the few adverbs you chose to use isn’t overly helpful.
The most useful comments, on the other hand, are reactions to the plot and structure of the story. Does it work for the reader emotionally? Are the characters well fleshed out and sympathetic, or wooden and distant? Is the dialog lively and realistic?
As an author, you know more about the scene you’re writing than you will put down in words. It’s easy to fall into the trap of assuming that the reader knows what you do, but often that’s not the case. Beta readers can alert you about the confusing spots and they can often be fixed by adding a sentence or two.
It’s especially important to look for patterns. You may love a certain scene or paragraph, but if reader after reader stumble over the same part of the story, something may be wrong.
A reader sees your story with a fresh eye. Often they can identify simple errors you’ve missed, even after going over the manuscript numerous times. It can be something as important as a contradiction (character has blond hair in one scene, red hair in another), an unintentional POV shift, or merely a missing comma. Let them help you make the manuscript as clean and presentable as possible, before you send it off to an editor.
Finally, and I can’t stress this enough, be generous in returning the favor. If someone has been kind enough to read and comment on your early story draft, be sure to offer them the same courtesy in return.
Alex Shvartsman is a writer and game designer whose fiction appeared in Nature Magazine, Daily Science Fiction, Buzzy Magazine and many others. He's currently editing Unidentified Funny Objects -- an anthology of humor science fiction and fantasy.
Learn more about Alex Shvartsman on his blog and on Twitter.
Every writer has an opinion about critiques. Some avoid them altogether; they trust in their ability to self-edit and prefer a submissions editor to be the first person who sees their work. I’m on the opposite end of the spectrum. I find the reactions from beta readers to be insightful, helpful, and almost addicting.Price of Allegiance, my space opera tale in Penumbra’s July issue, benefited from several rounds of critiques. I rewrote it, changing elements of the story and fixing problems identified by my readers. Over the course of receiving feedback on this and other stories, I learned that getting the best mileage out of critiques is an important skill in itself.
A crucial thing to keep in mind when reviewing a critique is that fiction is subjective. If you let ten people read your story, you will likely end up with eleven different opinions on how to make it better. Don’t default to making changes because a particular reader was unhappy with some aspect of your story. Listen to what they have to say, but weigh it against others’ opinions and especially against your own. Striking a balance between willingness to accept advice from others and knowing when to trust your gut is a key element to getting the most from your beta readers.
In my case the most commonly ignored beta reader comments are the staples. Often well-intentioned readers will default to familiar warnings: Cut the adverbs! Avoid exposition! Only ever use “said” in dialog tags!
No great story has been told entirely without adverbs or exposition. Those elements are like salt: you need a little to cook the dish, but too much will ruin it. If you’ve advanced beyond the beginner stage as a writer then you already know this, and eliminating the few adverbs you chose to use isn’t overly helpful.
The most useful comments, on the other hand, are reactions to the plot and structure of the story. Does it work for the reader emotionally? Are the characters well fleshed out and sympathetic, or wooden and distant? Is the dialog lively and realistic?
As an author, you know more about the scene you’re writing than you will put down in words. It’s easy to fall into the trap of assuming that the reader knows what you do, but often that’s not the case. Beta readers can alert you about the confusing spots and they can often be fixed by adding a sentence or two.
It’s especially important to look for patterns. You may love a certain scene or paragraph, but if reader after reader stumble over the same part of the story, something may be wrong.
A reader sees your story with a fresh eye. Often they can identify simple errors you’ve missed, even after going over the manuscript numerous times. It can be something as important as a contradiction (character has blond hair in one scene, red hair in another), an unintentional POV shift, or merely a missing comma. Let them help you make the manuscript as clean and presentable as possible, before you send it off to an editor.
Finally, and I can’t stress this enough, be generous in returning the favor. If someone has been kind enough to read and comment on your early story draft, be sure to offer them the same courtesy in return.
Alex Shvartsman is a writer and game designer whose fiction appeared in Nature Magazine, Daily Science Fiction, Buzzy Magazine and many others. He's currently editing Unidentified Funny Objects -- an anthology of humor science fiction and fantasy.
Learn more about Alex Shvartsman on his blog and on Twitter.
Saturday, June 16, 2012
4 ways to get mirror nails and why you should choose the cheapest one
![]() |
| pic via IT hunter |
I loved these nails since I saw them on the runway. Lately I've seen more brands realized their version of mirror nail varnish and of course I had to try them! There are at least 4 ways to obtain the mirror nails effect. How much are you willing to pay to look like your nails were dipped in gold? Good news! The million dollar look you're after is cheaper than you may think!
In questo periodo vediamo comparire sugli scaffali delle profumerie dei nuovi smalti che ci promettono di ottenere unghie ad effetto specchio come quelle fotografate durante la fashion week. Saranno all'altezza delle aspettative? Ci sono almeno 4 modi per ottenere unghie cromate. Quanto dovrete spendere per ottenere unghie riflettenti e lucide come se fossero state immerse nell'oro? Fortunatamente meno di quanto pensate!
Minx manicure $40 It's the original salon manicure that has been captured so many times during fashion week and made us fall in love with chrome nails.It should last 2 weeks.
Minx manicure. L'originale manicure fotografata durante la fashion week. Solo in un salone per le unghie.
Mirror effect nail polish.
Many brands produced their version of mirror nail polish (Maybelinne mirror magic - Stargazer - China Glaze Millennium - Zoya Trixie
Layla mirror magic to name a few).
To obtain a better effect polish your nails before applying the varnish and finish it with a top coat because these tend to chip easily.
I tried Pupa mirror nail polish and I was disappointed with the result. For me it doesn't look like a mirror at all. If you're looking for a real mirror effect, I mean a reflective effect skip these.
Smalti mirror effect
Come vi ho accennato prima ci sono diversi smalti che promettono di poter ottenere un effetto specchiato (Pupa mirror effect - Zoya Trixie - Layla mirror magic per nominarne alcuni). Prima di applicarli l'unghia va lucidata e vanno poi protetti con un top coat perchè tendono a scheggiarsi facilmente. Se state cercando l'effetto riflettente però questi smalti non fanno al caso vostro.
![]() |
| Nail rock nails wraps |
These can give you the minx manicure effect on a budget. I would definitely try these after reading Carly's easy step to step tutorial on how to apply them on nails. I loved the result she got.
![]() |
| How to apply nail wraps - Carly's step by step tutorial |
On top of the 4 ways to obtain mirror nails we have....
![]() |
| pic via Goose glitter |
Glue on chrome nails $6
For once the the best option is also the cheapest one! If you want real reflective nails go for fake nails! They will be thicker than real nails but you'll get a real mirror. Just glue them on and you're ready to go! Here's a quick easy way to get the high fashion look on a budget!
P.S. (Sally Hansen's chrome nails are on ebay starting from $0.99)
In cima alla mia lista dei 4 modi per ottenere unghie ad effetto specchio troviamo:
Le unghie finte! Anche se più spesse delle unghie vere sono le uniche ad assicurarvi l'effetto cromato e riflettente. Per una volta il risultato migliore è assicurato dall'opzione più economica. Non male!
Thursday, June 14, 2012
Those Onerous Overdone Outlines
By Larry Hodges
I used to outline in great detail. I'd do a detailed listing of each scene, with a paragraph or two describing what happens. I'd also have lengthy notes on the side, including character bios, descriptions, and notes on just about everything else. I'd also have pages of dialogue I planned to use - I'm always jotting down interesting snippets of dialogue that pop into my head.
When I did my first novel, I outlined in great detail. My notes totaled 12,000 words. After writing 23,000 words of the novel, everything came to a crashing halt. The novel just wasn't working, and I was bored out of my cranium writing it. The problem was I'd painted myself into such a detailed outline and plot that there was nothing really creative to do. I was just connecting dots, and the result showed.
I went back to it a year later, and threw out the detailed outline and most of what I'd written. This time I put together a very loose outline, with a few sentences outlining each chapter instead of the detailed outline of each scene I'd had before. The only detailed thing I worked out was the ending. Excluding research notes I'd already done (much of which I would still use), the outline was about two pages. I also had the many pages of dialogue I'd put together.
As I wrote the novel, the creative juices flowed. I'd start each chapter by reading the few sentences that outlined what was supposed to happen, then make the rest up as I went along. I'd often leave the outline which wasn't a problem as long as I continued to move in the general direction of the planned ending. I learned I could do whatever I wanted.
The novel still involved a lot of research, but I did most of that when it was needed, either looking it up on the spot, or making a note and researching it later.
As I wrote, the characters became more developed, and I created character bios as this happened. Later, I went back and fleshed out the characters, especially in the early chapters before I had started this practice.
I regularly browsed the dialogue pages I'd written, cannibalizing them whenever pieces fit, and sometimes even writing scenes in such a way that I could use a great piece of dialogue I'd written. This seems to be the one part I like to do in advance. Not only is it fun--I often act out the dialogue when no one's around--but I think it's helped turn dialogue into a strength of my writing. A key thing is to make sure the dialogue fits the scene--if you force it, the reader will know.
Using this new approach, productivity, creativity, and (hopefully) quality shot up.
I wrote a second novel that went much easier. I again used only the loose outline, plus many snippets of dialogue I wrote as I thought about the novel. After several rewrites, both novels are now making the rounds.
For short stories, I also have cut out the detailed outlines in favor of looser ones, along with bits of dialogue written in advance. I still like to work out the ending before my work is complete--a tip I learned from Isaac Asimov--but even that changes if I come up with a better ending. For short stories, I put together at most a half page of bullet points, a few side notes, and start writing. My new outlining strategy seems to have worked as I've sold over 60 short stories and have agents expressing interest in the novels.
Larry Hodges is an active member of SFWA with numerous short story sales. He was the 2010 Garden State Horror Writers Short Story Competition Grand Prize Winner. He's a graduate of the Odyssey Writing Workshop and a full-time writer with five books and over 1300 published articles.
To learn more about Larry Hodges and his work, please visit his website.
I used to outline in great detail. I'd do a detailed listing of each scene, with a paragraph or two describing what happens. I'd also have lengthy notes on the side, including character bios, descriptions, and notes on just about everything else. I'd also have pages of dialogue I planned to use - I'm always jotting down interesting snippets of dialogue that pop into my head. When I did my first novel, I outlined in great detail. My notes totaled 12,000 words. After writing 23,000 words of the novel, everything came to a crashing halt. The novel just wasn't working, and I was bored out of my cranium writing it. The problem was I'd painted myself into such a detailed outline and plot that there was nothing really creative to do. I was just connecting dots, and the result showed.
I went back to it a year later, and threw out the detailed outline and most of what I'd written. This time I put together a very loose outline, with a few sentences outlining each chapter instead of the detailed outline of each scene I'd had before. The only detailed thing I worked out was the ending. Excluding research notes I'd already done (much of which I would still use), the outline was about two pages. I also had the many pages of dialogue I'd put together.
As I wrote the novel, the creative juices flowed. I'd start each chapter by reading the few sentences that outlined what was supposed to happen, then make the rest up as I went along. I'd often leave the outline which wasn't a problem as long as I continued to move in the general direction of the planned ending. I learned I could do whatever I wanted.
The novel still involved a lot of research, but I did most of that when it was needed, either looking it up on the spot, or making a note and researching it later.
As I wrote, the characters became more developed, and I created character bios as this happened. Later, I went back and fleshed out the characters, especially in the early chapters before I had started this practice.
I regularly browsed the dialogue pages I'd written, cannibalizing them whenever pieces fit, and sometimes even writing scenes in such a way that I could use a great piece of dialogue I'd written. This seems to be the one part I like to do in advance. Not only is it fun--I often act out the dialogue when no one's around--but I think it's helped turn dialogue into a strength of my writing. A key thing is to make sure the dialogue fits the scene--if you force it, the reader will know.
Using this new approach, productivity, creativity, and (hopefully) quality shot up.
I wrote a second novel that went much easier. I again used only the loose outline, plus many snippets of dialogue I wrote as I thought about the novel. After several rewrites, both novels are now making the rounds.
For short stories, I also have cut out the detailed outlines in favor of looser ones, along with bits of dialogue written in advance. I still like to work out the ending before my work is complete--a tip I learned from Isaac Asimov--but even that changes if I come up with a better ending. For short stories, I put together at most a half page of bullet points, a few side notes, and start writing. My new outlining strategy seems to have worked as I've sold over 60 short stories and have agents expressing interest in the novels.
Larry Hodges is an active member of SFWA with numerous short story sales. He was the 2010 Garden State Horror Writers Short Story Competition Grand Prize Winner. He's a graduate of the Odyssey Writing Workshop and a full-time writer with five books and over 1300 published articles.
To learn more about Larry Hodges and his work, please visit his website.
Tuesday, June 12, 2012
Painting the Unreal
By Damien Walters Grintalis
Speculative fiction is a playground of possibility. Your story might be grounded in the reality of Earth or set on a distant planet, you might have clockwork animals and airships, wizards and magic, or perhaps there's a ghost beneath the floorboards. But no matter the scenario, readers want to believe in your world. It's up to you to paint a vivid picture.
Use wide strokes of your brush for the background and save the little details for the focal points. Add tiny hints for things you want to keep partially obscured, but still want the reader to note.
Engage the reader's senses. All of them. Wrap them in sights, sounds, tastes, scents, and tactile sensations. Let them feel the warmth of the sun on your characters' faces. Let them smell the smoke from a distant fire. But don't go overboard, either. If every fire smells like brimstone, don't choke the reader on the stench. If every drop of water tastes like honey and chocolate, don't give them a cavity. And if every house in your story is round with a thatch roof, you don't need to describe each and every one.
You can also use sensory information to paint the tone of the scene and the story itself. On the surface, there's nothing inherently wrong with stating "the door was tall and wide and painted the color of blood". But it's a rather flat description. It tells the reader that the door is red, sure, but what does it convey? Not much, in truth.
But if it's the only red door in a hallway lined with black doors? It says something is off kilter. Maybe there are strange sounds coming from behind the door. An invitation? A warning?
In a science fiction story, perhaps there's a smell of overheated electronics and a strange glow emerging from the gap beneath door. In fantasy, perhaps there's the sound of faerie wings fluttering or the kiss of heat from a dragon's exhalation. In horror, perhaps there's no light at all and the heavy thump of footsteps.
Find the balance between too much and not enough. You don't want to bury the story beneath an avalanche of description. Not everything needs to be spelled out. Conversely, there's nothing worse than reading a story that feels as if the characters are nowhere at all.
In the real world, our experiences are not limited to what we see. The same should hold true in fiction.
Damien Walters Grintalis lives in Maryland with her husband, two former shelter cats, and two rescued pit bulls. Her short fiction has appeared or is forthcoming in Penumbra eMag, Daily Science Fiction, Beneath Ceaseless Skies, and others. Her debut novel, Ink, will be released in December 2012 by Samhain Horror.
Learn more about Damien Walters Grintalis on her blog and on Twitter.
Speculative fiction is a playground of possibility. Your story might be grounded in the reality of Earth or set on a distant planet, you might have clockwork animals and airships, wizards and magic, or perhaps there's a ghost beneath the floorboards. But no matter the scenario, readers want to believe in your world. It's up to you to paint a vivid picture.
Use wide strokes of your brush for the background and save the little details for the focal points. Add tiny hints for things you want to keep partially obscured, but still want the reader to note.
Engage the reader's senses. All of them. Wrap them in sights, sounds, tastes, scents, and tactile sensations. Let them feel the warmth of the sun on your characters' faces. Let them smell the smoke from a distant fire. But don't go overboard, either. If every fire smells like brimstone, don't choke the reader on the stench. If every drop of water tastes like honey and chocolate, don't give them a cavity. And if every house in your story is round with a thatch roof, you don't need to describe each and every one.
You can also use sensory information to paint the tone of the scene and the story itself. On the surface, there's nothing inherently wrong with stating "the door was tall and wide and painted the color of blood". But it's a rather flat description. It tells the reader that the door is red, sure, but what does it convey? Not much, in truth.
But if it's the only red door in a hallway lined with black doors? It says something is off kilter. Maybe there are strange sounds coming from behind the door. An invitation? A warning?
In a science fiction story, perhaps there's a smell of overheated electronics and a strange glow emerging from the gap beneath door. In fantasy, perhaps there's the sound of faerie wings fluttering or the kiss of heat from a dragon's exhalation. In horror, perhaps there's no light at all and the heavy thump of footsteps.
Find the balance between too much and not enough. You don't want to bury the story beneath an avalanche of description. Not everything needs to be spelled out. Conversely, there's nothing worse than reading a story that feels as if the characters are nowhere at all.
In the real world, our experiences are not limited to what we see. The same should hold true in fiction.
Damien Walters Grintalis lives in Maryland with her husband, two former shelter cats, and two rescued pit bulls. Her short fiction has appeared or is forthcoming in Penumbra eMag, Daily Science Fiction, Beneath Ceaseless Skies, and others. Her debut novel, Ink, will be released in December 2012 by Samhain Horror.
Learn more about Damien Walters Grintalis on her blog and on Twitter.
Monday, June 11, 2012
Inspired by Oscar de La Renta royal fascinator DIY
![]() |
| Royal jubilee celebrations |
![]() |
| Oscar de La Renta fall 2012 collection |
![]() |
| Oscar de La Renta fall 2012 collection |
A few days ago London celebrated the Queen's diamond jubilee with spectacular celebrations. In 2012 the royal family is still very fascinating.
The Queen Elisabeth II definitely is a style icon (and long before Kate Middleton). Her style choices are very sharp and she's always perfectly polished in her matched outfits and accessories. She's not a fashion victim that will fall for trends (even if her beloved pastels are popular right now) and she's not interested in high fashion either but I think that she would admire Oscar de La Renta fall 2012 collection! It's a very elegant and opulent collection played around pastel colors. Dresses are heavy embellished with jewels. I istantly thought that these are the kind of dresses the modern royalty could wear. The embellished headband every model wears during the runway really captured my attention. It's a bold accessory that can be worn during an elegant night and it's very quick to make.
In questi giorni Londra celebra i 60 anni di regno della sua amata regina Elisabetta II.
La sovrana ha le idee molto chiare su cosa le piace indossare ed è sempre impeccabile nei suoi completi ed accessori perfettamente abbinati. Le sue scelte in fatto di stile vanno al di là dei trend stagionali e servono invece a supportarla nel suo ruolo istituzionale. La regina ha un sarto personale che si occupa dei famosi tailler pastello ma se dovesse scegliere un designer famoso sono sicura che rimarrebbe conquistata da Oscar de La Renta che nella collezione per il prossimo inverno ha presentato degli abiti eleganti riccamente decorati da gioielli. Un lusso decisamente regale declinato nei toni pastello. Che si sia davvero ispirato alla regina d'Inghilterra?
I fermacapelli gioiello indossati da tutte le modelle ci offrono lo spunto per creare un accessorio importante da indossare durante una serata elegante.
![]() |
| Avrete bisogno di: un fermacapelli - del raso grigio - una spilla - colla |
This is an unecessary step for you but I wanted to show you the trick. I wanted my headband to be larger so I glued on it a thick net.
Questo non è uno step necessario ma volevo mostrarvi questo trucco. Se volete allargare la fascia fermacapelli vi basterà incollarci una striscia di retina rigida.
It's all about covering the headband with a new fabric. I only added a little pleat in the middle to make the headband more dynamic.
La tecnica è semplice: dovete coprire di stoffa il fermacapelli e poi bloccarla con la colla. Tagliate poi la stoffa in eccesso.
The final touch is the brooch in the middle. Now you have your sparkly new fascinator. It would be also a nice DIY alternative to a wedding tiara.
Il tocco finale: appuntate una spilla luminosa al centro e il vostro fermacapelli gioiello è pronto!
Friday, June 8, 2012
Flame shoes DIY
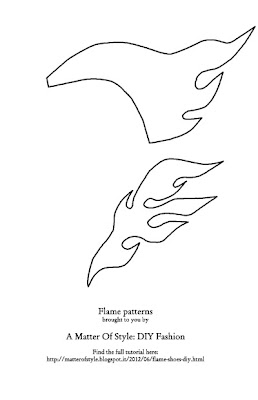
My favorite shoes are on fire! Wait there's no need to extinguish it! My new diy shoes take inspiration from the craziest shoes of the season: the flame shoes. I cut red and white pvc in the shape of flames and I glued them onto a pair of black pumps impatient to get a new personality. Now they're ready to set the party on fire!
Le mi scarpe preferite hanno preso fuoco! Non c'è bisogno di correre a spegnere l'incendio. Le mie nuove scarpe DIY si ispirano ad alcuni tra gli accessori più pazzi della stagione e oggi vi mostrerò come realizzare il vostro paio incollando del pvc rosso e bianco su un paio di scarpe classiche impazienti di sfoggiare un aspetto più accattivante.
![]() |
| The inspiration clockwise: Prada flame shoes - Jimmy Choo flame boots 2009 - Topshop western flat boots |
![]() |
| Born to be wild shoes - red and white pvc - un paio di scarpe classiche e del pvc rosso e bianco |
First step
![]() |
| flame pattern |
The pattern is designed for these peep-toe pumps but you can easily change its edge to fit your shoes!
Il modello si adatta alla scarpa che ho personalizzato. Potete facilmente cambiarne il bordo per adattarlo alle vostre scarpe.
![]() |
| Flames are easy to draw, they are all V- Per disegnare delle fiamme disegnate delle V |
![]() |
| Copy my drawings onto the pvc and cut the shape. - Copiate i miei disegni sul pvc e ritagliateli! |
Subscribe to:
Posts (Atom)