Showing posts with label do it yourself. Show all posts

Saturday, February 23, 2013

Burberry inspired eyelets and fringes earrings DIY

burberry prorsum fall 2013, fringe, eyelets, earrings diy,fashion diy, diy
Eyelets and fringes DIY earrings
burberry prorsum fall 2013 details
Burberry Prorsum fall 2013

I often appreciate Burberry Prorsum collections and the one that just walked the runway is no exception.
There are so many details that renew the classic Burberry trench and make the collection young and fresh, like sheer pencil skirts or the heart pattern over neutral beige or the metallic details.
I really liked bags and coats decorated with eyelets and fringes and I immediately imagined that detail becoming a  fun pair of earrings.
So here's the DIY tutorial.

La collezione di Burberry Prorsum è giovane e fresca,  piena di spunti creativi come la trasparenza delle gonne, la stampa a cuoricini sui cappotti e i dettagli metallici che spiccano sui toni neutri.
Molto originale l'ampio uso degli occhielli come decorazione di capispalla ed accessori. Un particolare che mi ha colpito più degli altri adatto ad essere trasformato in un divertente paio di orecchini.
Continuate a leggere per vedere il tutorial.


You'll need:
  • 2 eyelets 2 cm wide
  • a scrap of leather
  • scissors
  • glue
  • earring nails and backs

Occorrente:
  • 2 occhielli di 2 cm di diametro
  • un ritaglio di pelle
  • forbici
  • colla
  • chiodini per orecchini

    Start by applying an eyelet on leather. There is a tool often sold with the eyelets.
    Put leather between the top and the bottom part of the eyelet and press everything with the tool You may need to hammer it.

    Applicate l'occhiello sulla pelle. Spesso troverete l'applicatore nella confezione d'acquisto.


    Cut leather along the edge of the eyelet and then cut it straight down.

    Tagliate la pelle lungo il bordo dell'occhiello.


    Use scissors to fray the ends.
    Glue e piece of leather behind the eyelet and trim the edge.

    Sfrangiate la pelle con le forbici.
    Incollate un pezzetto di pelle dietro l'occhiello e rifilate il bordo.


    Glue an earring nail on the back and you've done. Have fun wearing your new pair of earrings!

    Incollate il chiodino. Uscite con il vostro nuovo paio di orecchini!

    Wednesday, January 9, 2013

    Gift bow earrings DIY tutorial

    gift bow earrings diy, do it yourself, fashion diy, how to make gift bow, gift idea
    gift bow earrings
    gift bow earrings diy, do it yourself, fashion diy, how to make gift bow, gift idea


    Often the best part of a gift it's the wrap. How many times we have shaken a package with curiosity to guess what was inside it or admired it from distance with impatience because we couldn't open it before the Christmas day. Some gift wrapping can create a lot of expectation like a Tiffany box or make us want to spend more only to own them, have you ever paid macarons more only to own a Ladurée box?
    Gift boxes are a mystery, a thin layer of paper between us and the surprise. Maybe the reason we keep making gifts is the chance to be really surprised by them. Gifts are joyful and evoke holidays, gift bows over them are unique. After transforming them into an unconventional man bow tie, here they are as women earrings. Make them only if you like funny accessories and you want to get noticed.
    Read the tutorial after the jump!


    A volte la parte migliore di un regalo sta proprio nel pacchetto. Quante volte li abbiamo agitati con curiosità per scoprire cosa ci fosse dentro o ammirati da lontano con impazienza sapendo di non poterli aprire prima del giorno di Natale. Certi pacchetti poi possono creare grandi aspettative come una scatola di Tiffany o spingerci addirittura a spendere di più pur di averli; alzi la mano chi ha accettato di pagare di più i macaron solo per avere una delle bellissime scatole Ladurée. I pacchetti regalo sono un mistero, quel sottile strato di carta che li avvolge si frappone tra noi e la sorpresa e credo che sia proprio la possibilità di essere veramente sopresi la ragione che ci spinge a rinnovare il rito dei regali. I pacchetti sono gioiosi ed evocano la festa e i fiocchi che spesso li sormontano sono inconfondibili. Dopo averli trasformati in un papillon da uomo eccoli declinati in versione orecchini da donna. Realizzateli solo se amate gli accessori spiritosi che si fanno notare.


    You'll need:
    •  pvc leather 
    • glue 
    • earring nails and backs
    Occorrente: 
    • ritagli di pelle o pvc
    • colla
    • chiodini per orecchini
    Cut strips of leather as shown - tagliate le striscie di pelle come mostrato


    Fold them like this on both sides and glue them in position. Piegatele come in figura su entrambi i lati e incollateli in posizione.

    Once folded they'll look like this. Glue the shorter strip one in a loop. Una volta incollate vi appariranno così. Chiudete la striscia più corta ad anello.

    Glue those of the same lenght one onto another, then glue the groups one onto another, from the biggest to the smallest.
    Incollate una sull'altra le punte della stessa lunghezza. Incollate poi i gruppetti uno sull'altro, dal più grande al più piccolo. 

    Glue a earring nail on the back of the leather gift bow and you've done.  Incollate il chiodino per orecchini dietro al fiocco e gli orecchini sono pronti.

    Friday, October 12, 2012

    How to make an embroidered top without embroider: A Tutorial

    fashion diy, embroidery
    DIY embroidered top
    fashion diy, embroidery


    Last friday we talked about  rich and sophisticated embroideries and how they are so popular for fall. We also saw a few tricks to obtain beautiful embroideries without actually embroider.
    I couldn't wait to have my embroidered top so I made (another) peplum and  today I'll show you how to make this rich embroidery in less than an hour.

    You'll need:
    • a top
    • a centerpiece
    • iron on interfacing or bondaweb

    La settimana scorsa abbiamo parlato di qualche trucco per realizzare un top ricamato senza saper ricamare. Non ho resistito a realizzare subito il mio ed oggi vi mostrerò come realizzare un ricamo elaborato in meno di un'ora.
    Avrete bisogno di:
    • un top
    • un centrotavola ricamato
    • telina termoadesiva o bondaweb 

      Start with a top and an embroidered center piece.


      Put the interfacing over the wrong side or the embroidery. The shiny side has glue on it.

      Disponete la telina sul rovescio del ricamo. Quel luccichio che vedete non è altro che colla.


      Iron the interfacing. The glue will melt and it will stick on the fabric.
      Once the interfacing is on, the fabric won't unthread and you'll be able to cut the embroideries off without damaging them.

      Stirate la telina. La colla sciogliendosi si attaccherà al ricamo. A questo punto potete tagliare via il ricamo dal centrotavola perchè non sfilerà più.


      Place the embroideries wherever you want.
      Differently from the classic interfacing, bondaweb is a double-sided adhesive that bond fabrics together simply by ironing. Once you place your embroideries you can iron them on and that's it,you've done!


      If you haven't bondaweb you can just stich the embroideries onto the top (or use a fabric glue).

      Since my embroidery is made by flowers and leaves I decided to connect them with branches so I drawn a line with a pencil and I made a basic embroidery Outline Stitch, here's how to do it:
      You'll need embroidery thread. This is moulinè. 

      Disponete i ricami a piacimento. Bondaweb, a differenza della telina classica ha la colla su due lati quindi basterà stirare i ricami sul top per incollarli. Se avete utilizzato invece la telina cuciteli sul top oppure fissateli con una colla per la stoffa.

      Visto che il ricamo che ho scelto è composto da fiori e foglie ho voluto connetterli con dei rami realizzati a punto erba. Ecco come ho fatto:

      Make the first stitch and come out with the needle at the middle and repeat.
      Stitches are close to each other, slightly overlapped.

      Eseguite un punto ed uscite con l'ago a metà. Ripetete. 
      I punti sono vicini l'uno a l'altro e leggermente sovrapposti.

      This is how it looks once done.
      Ecco come appare il punto una volta finito.

      Saturday, September 15, 2012

      Get into fall trends : how to make a leather fringe skirt


      leather skirt, do it yourself, diy, fringe skirt, tutorial, how to
      fall 2012 trends, leather trend, lanvin, valentino, givenchy
      Valentino - Lanvin - Givenchy fall 2012

      Fall collections are all about leather: coats, dresses, skirts, trousers and accessories, they are all made of leather. If you're a fan of the dark allure leather can evoke this is your chance to wear it head to toe.
      Today I'll show you how to make a leather fringe skirt. All you need is 60 cm of black leather or faux leather fabric to cover  a 40 cm long skirt. Get a pair of scissors and read the full tutorial here


      I designer non hanno dubbi riguardo al trend dominante della stagione invernale: è la pelle su vestiti, cappotti e accessori. Caliamoci allora nel mood dark di stagione creando una gonna con frange in pelle per una dark lady che non si prende troppo sul serio con un look giovane e divertente.

      Saturday, August 25, 2012

      The secret recipe for unique earrings : pasta, oil & chili peppers

      Dolce&Gabbana, pasta earrings, diy, fashion diy

      Dolce&Gabbana, pasta earrings, diy, fashion diy
      the inspiration: Dolce&Gabbana pasta earrings
      Dolce&Gabbana are the ambassadors of the italian lifestyle in the world. This time they used  pasta to make fun and mediterranean pieces of jewelry. Taking inspiration from their work I used pasta,chili pepper beads and artificial leaves. Take a note of the ingredients and follow the tutorial to make your pair of tasty  earrings!


      Dolce&Gabbana  ci invitano a riscoprire uno dei simboli dell'italianità all'estero: la pasta. Non dovete temere per la linea però, i grandi stilisti non ci invitano a mangiarla bensì ad indossarla sottoforma di divertenti accessori.
      Proprio ispirandomi alla loro collezione p/e 2012 ho utilizzato pasta,peperoncini e una foglia di basilico per realizzare questi orecchini. Segnatevi gli ingredienti e seguite il tutorial per realizzare i vostri orecchini da mangiare con gli occhi!

      You'll need
      • Artificial leaves
      • Pasta
      • chili pepper beads (previosly used to make the floating claw ring)
      • earring hooks
      • chain
      • pliers
      • jump rings
      • 4 bead caps
      • transparent paint
      • a driller
      • metallic wire
       Avrete bisogno di:
      • farfalle di pasta
      • perline a forma di peperoncini
      • foglie artificiali
      • gancetti per gli orecchini
      • una catenella
      • pinze
      • un trapano
      • 4 coppette dorate
      • anellini di congiunzione
      • vernice trasparente
      • filo metallico
      1 piece and 2 different uses. Flatten the bead cap with a hammer to obtain a star shaped finding then cut it in the middle to create the perfect bead cap for the chili peppers, press it in position

      la coppetta si fa in 2: schiacciate la coppetta dorata con un martello per ottenere un nuovo charm a forma di stella.  Tagliate la stella al centro per ottenere un decoro per i peperoncini.

      Don't they look good with their crown on?
      Premete la stellina sul peperoncino per decorarne la sommità.

       Connect the chili pepper beads and an artificial leaf to a piece of chain using jumprings. 

      Connettete i peperoncini alla catenella utilizzando gli anelli di congiunzione


      Apply a coat of transparent paint over your pasta to make it waterproof. It will look oily like just been dressed. Pierce your pasta in the middle with a driller. Insert ithe metallic wire into the hole and make a tiny loop at each end. Add the earring hooks and you've done!

      Impermeabilizzate la pasta con uno strato di vernice trasparente. Oltre a proteggerla nel tempo le donerà un aspetto oleoso ed appetitoso. Forate la pasta con il trapano. Inserite il filo metallico nel foro e fate una cappiolina ad ogni estremità con l'aiuto delle pinze. Connettete la pasta ai peperoncini. Finite aggiungendo i ganci per gli orecchini.

      Saturday, August 4, 2012

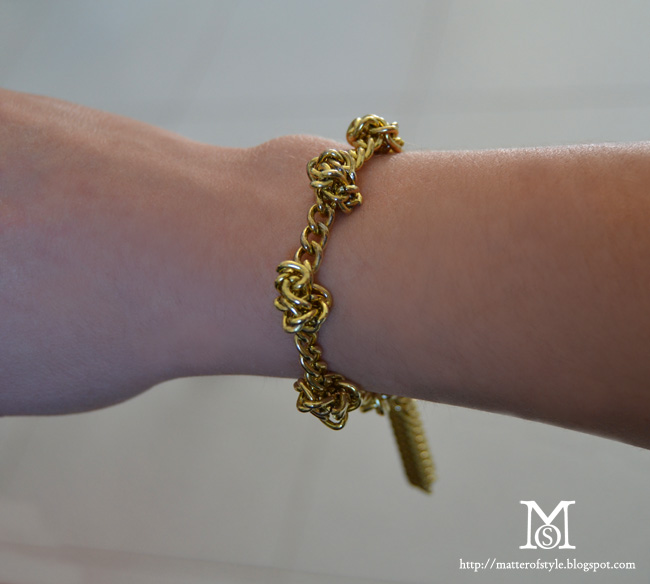
      Vintage inspired knot and chain bracelet DIY


      I liked the idea of a chunky chain bracelet that would look a bit like a vintage piece of jewelry so I made this bracelet. using a very easy technique to make it. This bracelet is made knotting the chain like it was a piece of rope and then I adding a sassy little tassle at the end that will swing as you move.

      you'll need:
      pliers
      chain
      metallic wire
      clasp

      knot the chain 

      cut a few pieces of rope

      join them together with a jumpring

      connect the tassle at the end


      block the knots with a tiny piece of metallic wire

      Friday, June 8, 2012

      Flame shoes DIY

      flame shoes diy, shoes diy, diy shoes, fashion diy, prada flame shoes diy, prada inspired flame shoes diy, do it yourself, cadillac shoes, jimmy choo flame shoes, topshop flame western boots,
      flame shoes diy, shoes diy, diy shoes, fashion diy, prada flame shoes diy, prada inspired flame shoes diy, do it yourself, cadillac shoes, jimmy choo flame shoes, topshop flame western boots,
      flame shoes diy, shoes diy, diy shoes, fashion diy, prada flame shoes diy, prada inspired flame shoes diy, do it yourself, cadillac shoes, jimmy choo flame shoes, topshop flame western boots,

      My favorite shoes are on fire! Wait there's no need to extinguish it! My new diy shoes  take inspiration from the craziest shoes of the season: the flame shoes. I cut red and white pvc in the shape of flames and I glued them onto a pair of black pumps impatient to get a new personality. Now they're ready to set the party on fire!


      Le mi scarpe preferite hanno preso fuoco! Non c'è bisogno di correre a spegnere l'incendio. Le mie nuove scarpe DIY si ispirano ad alcuni  tra gli accessori più pazzi della stagione e oggi vi mostrerò come realizzare il vostro paio incollando del pvc rosso e bianco su un paio di scarpe classiche impazienti di sfoggiare un aspetto più accattivante.

      The inspiration clockwise: Prada flame shoes - Jimmy Choo flame boots 2009 - Topshop western flat boots
      Born to be wild shoes - red and white pvc - un paio di scarpe classiche e del pvc rosso e bianco

      First step 

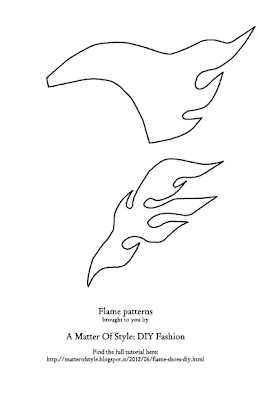
      flame pattern
      The pattern is designed for these peep-toe pumps but you can easily change its edge to fit your shoes!
      Il modello si adatta alla scarpa che ho personalizzato. Potete facilmente cambiarne il bordo per adattarlo alle vostre scarpe.
      Flames are easy to draw, they are all V- Per disegnare delle fiamme disegnate delle V
      Copy my drawings onto the pvc and cut the shape. - Copiate i miei disegni sul pvc e ritagliateli!
       I cut the red shapes a little bit smaller than white ones then I glued them together
      Ritagliate le stesse forme bianche e rosse - ritagliate quelle rosse solo un po' più piccole e incollatele una sull'altra
      I reinforced the flame at the back with black leather so they can burn in the air
      then I glued these shapes onto the shoes.
      Rinforzate il retro delle fiamme incollandoci altra pelle così rimarranno dritte. Infine incollate le forme sulle scarpe