Showing posts with label jewelry diy. Show all posts

Thursday, May 9, 2013

Mother's day gift idea : pearls and roses jewelry set DIY

mother's day gift idea, pearls and roses jewelry set, diy jewelry, diy earrings, diy bracelet, diy earrings

mother's day gift idea, pearls and roses jewelry set, diy jewelry, diy earrings, diy bracelet, diy earrings

Nowadays the rule is to mix and match different patterns and styles to create a modern and unique look. Jewelry sets aren't so popular like they used to be years ago, but they can be a pretty alternative to arm parties and statement pieces that are better worn on their own.
With few elements combined wisely we can craft a whole darling jewelry set for mom.


Oggigiorno si tende a mescolare stili e stampe diverse per creare un look moderno e originale. Le parure non sono più così popolari come qualche anno fa ma sono una elegante alternativa agli arm party e ad accessori statement che è consigliabile indossare da soli per via delle loro dimensioni.
Con pochi elementi combinati con eleganza possiamo realizzare un'intera parure che sarà perfetta come dono in occasione della festa della mamma


You'll need:

5 big rose acrylic beads
7 medium rose acrylic beads

2 size pearls
2 clasps
2 earring nails
glue
thread and needle

Occorrente:

5 perline a forma di rosa grandi
7 perline a forma di rosa piccole
perle di due dimensioni
2 moschettoni
2 chiodini per orecchini
colla
ago e filo


Knot the tread and insert small pearls. 
Annodate il filo e inserite le perline piccole.


Once arrived at the center alternate a rosette with a pearl. Continue to add pearls. 
Arrivate al centro della collana inserite le rose intervallate da una perlina. Continuate ad aggiungere perline sull'altro lato.


Finish the necklace with a clasp and a jump-ring as a closure. 
 Terminate la collana con un moschettone da un lato e un gancetto dall'altro.

mother's day gift idea, pearls and roses jewelry set, diy jewelry, diy earrings, diy bracelet, diy earrings

Repeat the steps above to make the bracelet.
Glue the earring nail behind the small roses and the parure for your mom is done.

Ripetete gli step per realizzare il bracciale.
Incollate i chiodini per orecchini dietro due roselline più piccole e la vostra parure è pronta.

Sunday, April 7, 2013

Put 78 pearls in one bracelet if you dare

chanel pearl inspired bracelet, chanel spring 2013, DIY, jewelry diy, MY DIY, necklace diy, pearls bracelet, statement necklace,
Chanel inspired pearl bracelet tutorial on Style.it

chanel pearl inspired bracelet, chanel spring 2013, DIY, jewelry diy, necklace diy, pearls bracelet, statement necklace,
Chanel spring 2013 pic via Style.it
Big, many, luxe is back to ostentation. Those who believe in the discreet elegance of a single strand of pearls will faint watching Karl Lagerfeld's cascade of pearls in Chanel s/s 2013 collection.  If the basic rules of style tell to wear just one outrageously big bracelet, Karl doubles them and adds an even bigger necklace. And, you know what? The result is excessive, but still very elegant. Put 78 pearls in one bracelet if you're not afraid of showing off. You may use all the pearls in your stash to diy one of the most popular spring  must have, but you'll also make a necklace at the same time.

This bracelet is a smart one and can be converted into a necklace in a snap. Want to see how? Then,


For more diy bracelets go this way

Monday, February 4, 2013

Heart and arrow love ring DIY

love ring, diy, fashion diy, my diy, valentine's diy gift idea, gift idea, ring diy, metal wire, jewelry diy, tutorial
Valentine's day love ring diy

Valentine's day is approaching, do you feel romance in the air? Not yet? Get in the mood crafting this little wire love ring for yourself or as a gift for your girlfriend.

More Valentine's day diy ideas here.


love ring, diy, fashion diy, my diy, valentine's diy gift idea, gift idea, ring diy, metal wire, jewelry diy, tutorial

love ring, diy, fashion diy, my diy, valentine's diy gift idea, gift idea, ring diy, metal wire, jewelry diy, tutorial

Friday, December 14, 2012

DIY gift idea: make luxury arm party bracelets

arm party, diy gift idea, christmas diy,make bracelets, how to
DIY bracelets

arm party, diy gift idea, christmas diy,make bracelets, how to
Rope DIY bracelets


Building our arm party was so much fun I wanted to do it again. This bracelet is an updated version of one of the 5 bracelets I made this summer and this is what you get when you go bigger and bolder. A bigger rope gave to the bracelet a whole new look, a luxury feel to enlight your holidays parties. When you make one you cannot stop it, make them in different colors and wear them all together. You'll be tempted to keep the arm party for yourself but if your friends have been very nice this year you may be so generous to diy a bracelet for them too.


Saturday, November 17, 2012

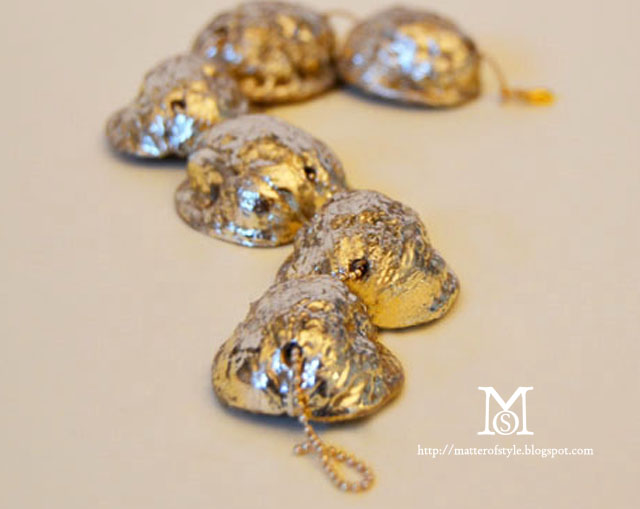
Gold dipped walnut bracelet tutorial

diy, fashion diy, walnut bracelet
gold foil walnut bracelet
diy, fashion diy, wlnut bracelet

Do you know how to open a walnut without smashing its shell? I didn't know that was possible untill I saw that my friend Pietro was capable to do it.
Last year I started collecting pieces of jewelry inspired by nature (do you remember the leaves necklace tutorial?) and once I had these beautiful walnut shells available it was easy to figure it out how to use them.
I dipped them in gold using gold aluminum foil to exalt their own beauty and then used them just like beads.
I still haven't told you how to not smash the shell (but maybe I'm the only one who didn't know it!). You have to insert the tip of a knife in a hole between the two shells, pivot the hand clockwise and *click* the walnut opens.
I used a driller to pierce these walnut. Please be careful when using these tools.
Curious enough to see the full tutorial?


Sapete aprire una noce senza schiacciarne il guscio? Beh io non sapevo fosse possibile fino a quando non ho visto farlo dal mio amico Pietro. E' quasi una magia, si inserisce la punta del coltello fra i due gusci, si ruota la mano e tac la noce scatta come una serratura e si apre.
E' circa un anno che colleziono gioielli ispirati alla natura (vi ricordate il tutorial per realizzare la collana con le foglie?) e quando ho scoperto come salvare i gusci di noce ho capito subito come li avrei utilizzati.
Dopo averli cosparsi d'oro di pellicola dorata li ho utilizzati come perline.
Se siete curiose di vedere come ho realizzato il braccialetto?

Tuesday, August 21, 2012

Reinvent&Reuse : neon phone coil bracelet tutorial

neon bracelet, neon diy, spray paint diy, fashion diy, coil bracelet, bracelet diy, jewelry diy, summer diy

You can find many things around the house that can be reinvented with creativity and transformed in a unique piece of wearable fashion. 
Today I used a piece of phone coil cable to make a fun neon summer bracelet.
You'll need:
  • coil wire
  • neon spray paint
  • a stapler
Molti oggetti che abbiamo in casa possono essere totalmente trasformati ed avere una seconda opportunità di essere utilizzati. Guardandoli da un'angolazione diversa si possono intuire delle potenzialità inespresse ed immaginare destinazioni d'uso del tutto nuove. Con un po' di creatività molti di essi possono diventare degli accessori moda originali.
Oggi trasformeremo un cavo telefonico spiralato in un bracciale estivo.
Vi serviranno:
  • un cavo telefonico
  • vernice spray in tonalità neon
  • una spillatrice


Cut a phone telephone coil cable . Wrap it around your wrist to take the measurement.

Avvolgete il cavo intorno al polso per prendere la misura e tagliate il cavo.
 
Close the loop. Overlap a tiny piece of cord and pin it with a stapler twice. One on each side.

Chiudete il bracciale. Sovrapponete una piccola porzione del cavo e bloccatelo con la cucitrice. Fissate un punto su ogni lato.

Here's a close up look.
Ecco la chiusura vista da vicino.

neon bracelet, neon diy, spray paint diy, fashion diy, coil bracelet, bracelet diy, jewelry diy, summer diy
Spray it!
Spruzzate il bracciale con la vernice neon.

Saturday, August 4, 2012

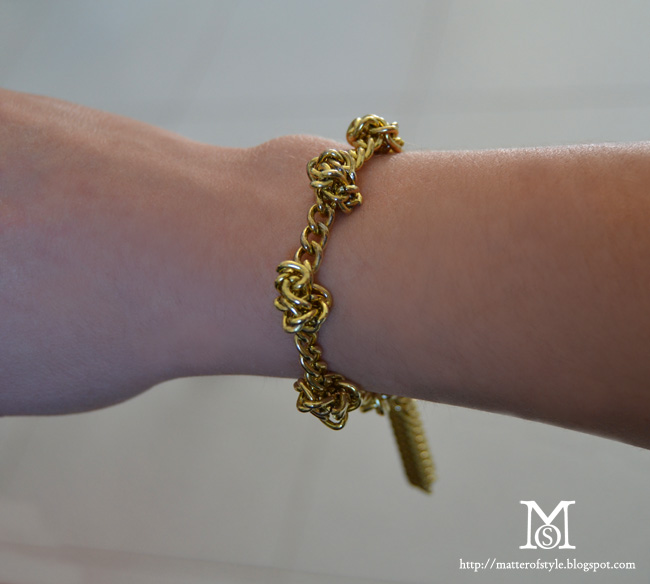
Vintage inspired knot and chain bracelet DIY


I liked the idea of a chunky chain bracelet that would look a bit like a vintage piece of jewelry so I made this bracelet. using a very easy technique to make it. This bracelet is made knotting the chain like it was a piece of rope and then I adding a sassy little tassle at the end that will swing as you move.

you'll need:
pliers
chain
metallic wire
clasp

knot the chain 

cut a few pieces of rope

join them together with a jumpring

connect the tassle at the end


block the knots with a tiny piece of metallic wire

Monday, July 30, 2012

DIY inspiration : Ear cuffs


ear cuff, jewelry
ear cuff, jewelry
this is an "old school" ear cuff to me, this style was popular even few years ago
ear cuff, jewelry
this is a new school one: statement, bold exagerated ear cuff -  pics via supermeow's wonderland
ear cuff, jewelry
pearl ear cuff via Vogue
ear cuff, jewelry
ear cuff, jewelry
multiple chains hanging from the ear, that would be a super fast DIY - I think charms with crosses are very in right now
ear cuff, jewelry
a hook + a chain + a comb = rad diy- pic via Asos
New ways to adorn your ears and just one rule: pull your hair up and show your style Here's a few inspirational images I collected to inspire you to make your own DIY ear cuff.

Tuesday, July 24, 2012

Discover the DIYer secret weapon and make a pair of studded earrings


Learn how to turn some harmless pearls into these spiky mines.
Firstly I'll give you a good excuse to buy new nail polish. From now on we are not only using them to paint our nails but also as a diy secret weapon. New shades for nails are out very often. There are almost an infinite variety of colours, some very sophisticated, chromed or iridesents, with glitters. The vast majority of nail polishes are inexpensive and sold in small sized bottles, perfect for your diy projects. Shortly nail polish can be a good alternative to paint sometimes: it's cheaper and you can buy it almost everywhere. Let's face it: we'll always have more bottles of nail varnish than cans of paint.
In addiction I'll show you a little trick to keep rounded surfaces from rolling while you paint them. 

Oggi vi mostrerò come trasformare delle innocue perle in un paio di orecchini decisamente aggressivi.
Ma prima vorrei fornirvi una buona scusa per comprare altri smalti per le unghie. Anche se pensati per decorare le nostre unghie, a volte gli smalti possono essere una furba alternativa alla vernice. Pensateci: esistono in mille colori diversi, alcuni molto sofisticati, cangianti o pieni di glitter; sono venduti in piccole dosi, perfette per i vostri progetti fai da te e spesso sono economici. E poi ammettiamolo: avremo sempre più bottigliette di smalto in casa che lattine di vernice. 
In più vi mostrerò un piccolo trucco per impedire alle superfici tonde di rotolare mentre le dipingete.


You'll need:
nail polish
2 pearls
chain
2 earring hooks 
glue gun
glue
metallic wire 
pliers

avrete bisogno di:
smalti
2 perle
una catenella
2 ganci per gli orecchini
colla a caldo
colla
filo metallico
pinze

Plastic pieces from cocktail forks, previosly used to make crystal earrings

 ho usato delle punte in plastica ricavate da delle forchette da cocktail che precedentemente avevo usato per realizzare degli orecchini trasparenti

To keep pearls and other stuff from rolling while you're painting them you can temporarily glue them on a piece of paper using the glue gun

Per evitare che le superfici tonde rotolino mentre le dipingete potete incollarle temporanemente su un pezzetto di carta con della colla a caldo

Your sparkly nail polish will make these pearls shine
Il vostro smalto glitterato farà risplendere le perle
 
Good pearls gone bad: Paint the plastic forks pieces with black nail polish and then glue them onto the pearls

Stendete lo smalto nero sulle punte e poi incollatele sulla perla


Once everything is dry insert the metallic wire into the pearl and make a loop with pliers. Connect the spiky pearl to a piece of chain. Add a earring hook and you've done.

Quando la colla sarà asciutta  inserite nella perla il filo metallico e realizzate un gancetto. Collegate la vostra "mina" ad un pezzetto di catenella e la catenella ad un gancio per gli orecchini.

Sunday, May 27, 2012

Flower necklace DIY

flower necklace, necklace diy, jewelry diy, recycled materials, no waste sew, spring diy, flower diy, diy, fashion diy
flower necklace DIY
shoes Elio Fiorucci for OVS industry

Today I made a flower necklace inspired to my new pair of shoes. If you've been reading this page for a while you may recognize the fabric from the flapper dress DIY. This is again a quick project you can make with little fabric scraps so you can have no waste and more diy fun! Here's how I made it.

Oggi ho realizzato una collana ispirandomi al paio di scarpe che ho appena acquistato. Ecco un altro veloce fai da te che potrete realizzare utilizzando piccoli pezzetti di stoffa che avete in casa valorizzando al massimo le rimanenze.

You need: fabric scraps (this is georgette fabric) - a piece of rope - scissors - needle and thread
Avrete bisogno di: stoffa (questa è georgette) - un cordone - forbici - ago e filo
Fold the fabric in half, fold it again in the opposite direction, measure 3 cms on both sides, cut it
Piegate a metà la stoffa - Piegatela ancora nella direzione opposta - Misurate 3 cm ambo i lati e tagliate un arco di circonferenza


You've cut a circle - Keep it folded and block it with a stich or two and then sew it onto the rope - Keep adding petals.

Avete così tagliato un cerchio - Mantenetelo piegato e bloccate la stoffa in posizione con un punto o due, Trovate il centro della corda e cucite il petalo - Continuate ad aggiungere petali

flower necklace, necklace diy, jewelry diy, recycled materials, no waste sew, spring diy, flower diy, diy, fashion diy

When you finish a row overlap another one or two. Add a clasp at the end and you've done!
Terminata una fila di petali sovrapponetene un'altra. Aggiungete un moschettone e la collana è pronta!