Showing posts with label valentine's day diy. Show all posts

Friday, March 8, 2013

Your DIY pick: Pom Pom shoes DIY tutorial

diy shoes, shoes diy, diy, my diy, fashion diy, parrot shoes diy, l .k. bennett caroline issa parrot shoes, pom pom shoes diy, pom pom diy, valentine's day gift idea, valentine's day diy,
pom pom parrot shoes DIY
diy shoes, shoes diy, diy, my diy, fashion diy, parrot shoes diy, l .k. bennett caroline issa parrot shoes, pom pom shoes diy, pom pom diy, valentine's day gift idea, valentine's day diy, heart shoes,
Caroline Issa  for L.K. Bennett parrot shoes
the inspiration - Your DIY pick:  Caroline Issa  for L.K. Bennett parrot shoes

Welcome to the "Pick your DIY" final stage. You, dear readers, pinned what you love around the web on our Pinterest board and we, crafty fairies (7 diy bloggers) transformed your favorite stuff in a DIY tutorial.
We'll keep the board active to collect diy inspirations and diy wishes so read how to get invited and start pinning if you haven't yet.
Today it's my turn to unveil the DIY tutorial of one of the most voted item, you'll see the other 6 on Sunday.

Firstly I would like to thank you for joining and for picking these super fun shoes that I didn't notice, how could I miss them? They scream spring with all these colors.
They are limited edition shoes designed for L.K. Bennett by the fashion icon Caroline Issa. Only 300 pair were made, you can  buy them here.
I would have called these shoes " fiesta latina" because they're so fun!
Ok now back to the DIY tutorial because this is what you asked me and not to give them a name.
Let's see together how to make these shoes (with very basic supply)!


Due settimane fa io e altre 6 diy bloggers abbiamo inaugurato per voi la bacheca di Pinterest "Pick your DIY". Voi avete salvato i vostri articoli preferiti dal web e noi con le nostre manine li abbiamo trasformati in tutorial di moda fai da te.
Grazie per aver partecipato numerosi, la bacheca rimarrà aperta per raccogliere i vostri desideri, leggete qui come come aderire se già non lo avete fatto.
Oggi vedrete il tutorial per realizzare uno degli articoli più votati, le scarpe di L.K. Bennett disegnate dalla fashion icon Caroline Issa;  scoprirete tutti gli altri domenica.
Complimenti per la scelta, sono delle scarpe deliziose e coloratissime adatte a inaugurare la primavera. Vediamo come realizzarle.


supply
You'll need:
  • trims ( 1,2 meters of red heart trim - 4 flowers of lace trim (or lace applique or flower patches)- 2 meters yellow trim)
  • glue
  • scrap of leather
  • left over wool yarn in many colors
  • shoes
  • fabric markers
It doesn't matter the kind of trimming you're going to use, pick them for their bright colors, there are plenty to choose from at the haberdashery.

Occorrente:
  • trine (1,2 metri di trina cuori - 4 fiori di trina di pizzo o toppe a forma di fiore - 2 metri di trina gialla)
  • colla
  • un ritaglio di pelle
  • fili in lana
  • scarpe
  • pennarelli stoffa
Scegliete le trine che più vi piacciono in merceria, prendetene di colori sgargianti.


Glue your trims around the edge of your shoe. I glued the red one over the yellow to recreate the zig zag pattern of the original shoe. You may be luckier than me and find some zig zag trims at your local store that are closer to the original.

Incollate le trine sul bordo della scarpa. I cuori ricreano il motivo zig-zag della scarpa originale. Se siete fortunate troverete una trina zig-zag già pronta in merceria.


This is how they look when done. The original shoes are more pointy than mine.

Ecco come appariranno finite.


Color lace flowers with fabric markers and let them try.

Colorate i fiori in pizzo con i pennarelli per la stoffa. Comprando le toppe a forma di fiore potrete saltare questo step.


Glue your flowers at the tip of the toe and at the top of the heel. I didn't liked how the mesh part looked onto shoes so I filled it with thread making it look embroidered.

In this case also flower patches could work very well. No coloring is needed just glueing. Unfortunately I didn't find any I liked but I suggest to search for them so you can jump one step.

Incollate i fiori sulla punta della scarpa e alla sommità del tacco. 
Non mi convinceva l'effetto della retina sulla scarpa quindi ho riempito il fiore di filo dandogli un aspetto ricamato.


Cut two little pieces of leather and glue them at the ankle.

Ritagliate due pezzetti di pelle e incollateli sul retro del tallone.


Cut two strips of leather 2,5 cm wide and 25 cm long and fold them in three to get the ankle strap. Glue a little trim onto it to decorate it. Sew a snap button at the edge to fasten it around the ankle.

Now the funniest part. While making these shoes I could try a technique that I saw many times on Pinterest. It's an easy way to make miny pom poms using a fork.  The original tutorial is by Vivid please.

Tagliate due striscie di pelle larghe 2,5cm e lunghe 25cm. Piegatele in tre per ottenere il laccetto che cinge la caviglia. Incollate la trina decorativa sul lato dritto. Cucite due bottoni automatici ai margini per legare il laccetto alla caviglia.

Per realizzare i pom pom ho utilizzato una tecnica facile e divertente che ho visto molte volte su Pinterest.
Il tutorial originale è di Vivid Please.

pom poms, how to make mini pom poms, spaghetti pom poms,yarn spaghetti


I used some left over yarn to make them. Now pom poms are ready to be knotted onto shoes. And you've done! Shoes are ready!

Terminate legando i pom pom alla scarpa. Guardate altre scarpe fai da te qui.


More diy shoes this way.

Wednesday, February 13, 2013

Infinite love bracelet DIY

valentine's day gift idea, gift idea, infinite math, bracelet diy, fashion diy, diy

Here's another Valentine's day little jewel. This bracelet doesn't have any closure, well if you receive a gift that is a symbol of infinite love you shouldn't take it off...just kidding. You can make it long enough to put it on or add a closure next to the infinite symbol. I think it's a nice alternative to hiding it on the other side of the bracelet. If you think this bracelet can make a nice last minute gift idea I suggest you to pair it with these funny nerd Valentine's cards I saw on true blue me&you.

More Valentine's day diy ideas here.


Cut a piece of metallic wire and twist it 


Curl it in the shape of eight and cut away the loop


Connect the infinite symbol to a piece of chain with two jump rings.
Regulate the lenght so you can put it on without using a closure or insert a clasp to connect to the infinite symbol.

Monday, February 4, 2013

Heart and arrow love ring DIY

love ring, diy, fashion diy, my diy, valentine's diy gift idea, gift idea, ring diy, metal wire, jewelry diy, tutorial
Valentine's day love ring diy

Valentine's day is approaching, do you feel romance in the air? Not yet? Get in the mood crafting this little wire love ring for yourself or as a gift for your girlfriend.

More Valentine's day diy ideas here.


love ring, diy, fashion diy, my diy, valentine's diy gift idea, gift idea, ring diy, metal wire, jewelry diy, tutorial

love ring, diy, fashion diy, my diy, valentine's diy gift idea, gift idea, ring diy, metal wire, jewelry diy, tutorial

Sunday, January 27, 2013

How to make an arrow ring with metal wire

arrow ring diy, how to, tutorial, metal wire diy, diy, fashion diy, valentine's day crafts, valentine's day ring


Is this a western arrow or a cupid's one? Both lovers of tribal inspired jewelry and romantic girls looking forward Valentine's Day can easily jump on the arrow jewelry trend with this metal wire arrow ring. All you need is metallic wire, pliers and 10 minutes of your time. Ready for some DIY fun?

Arma da guerra o freccia di cupido? Questo anello potrebbe mettere d'accordo sia le fan dei gioielli di ispirazione tribale che le ragazze romantiche che già pensano al giorno di S.Valentino. Per realizzarlo bastano: filo metallico, pinze e dieci minuti del vostro tempo.


arrow ring diy, how to, tutorial, metal wire diy, diy, fashion diy, valentine's day crafts, valentine's day ring

Saturday, August 4, 2012

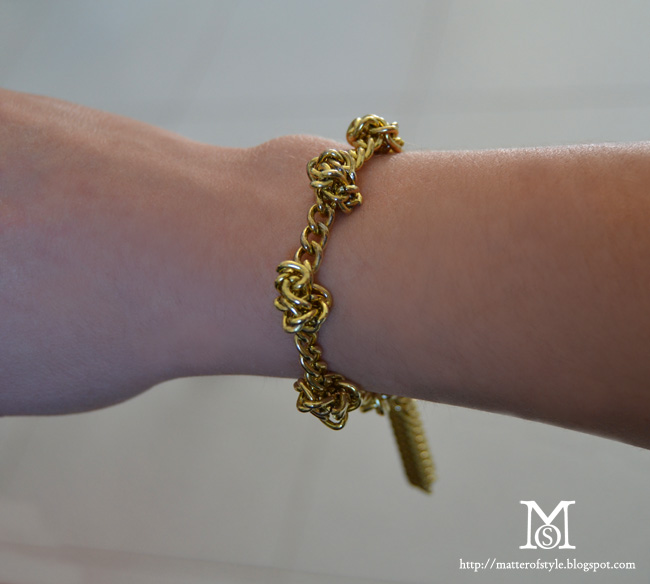
Vintage inspired knot and chain bracelet DIY


I liked the idea of a chunky chain bracelet that would look a bit like a vintage piece of jewelry so I made this bracelet. using a very easy technique to make it. This bracelet is made knotting the chain like it was a piece of rope and then I adding a sassy little tassle at the end that will swing as you move.

you'll need:
pliers
chain
metallic wire
clasp

knot the chain 

cut a few pieces of rope

join them together with a jumpring

connect the tassle at the end


block the knots with a tiny piece of metallic wire

Friday, February 10, 2012

Valentine's day Love shoes DIY with glitter hearts

gift ideas for valentine's day, valentine's day, valentine's day diy, diy shoes, shoes diy, heart shoes, glitter shoes, diy glitter shoes, glitter heart diy, diy, MY DIY, fashion DIY,
your Valentine's day shoes
DIY supply: glitter - glue- brush

Glitter shoes are an irresistible fashion DIY, it's easy to do and the result is awesome. Please raise the hand everyone who has glittered his shoes this year.  Nobody can ignore a pair of sparkly feet and as the Paolo Nutini song says "I put some new shoes on and suddently everything's right", we all want new shoes. Is there anything better than free shopping in your closet? 
Today DIY is about Valentine's day shoes. Grab your pair of black pumps, a brush, glue (diyer best friend) and a pot of glitters. 
  1. Dip the brush into the glue
  2. Draw an heart shape on the back of your heels with the brush (trace the shape with chalk to be accurate)
  3. Fill the shape with glue
  4. pour the glitters
  5. Let it dry
  6. spray a sealant on your hearts
If you liked these shoes, have a look at another pair of DIY glittered pumps
or see all DIY shoes

Se una volta la porporina era esclusivo appannaggio dei centrotavola natalizi, oggi la tentazione di illuminare le nostre scarpe con i glitter è diventata irresistibile. Alzi la mano chiunque ha realizzato un paio di scarpette luccicanti quest'anno. Un diy semplice da realizzare con un risultato veramente appariscente.
San Valentino è vicino, realizzate un paio di scarpe a tema velocemente seguendo questi step.
Avete bisogno di:  scarpe, colla vinilica, glitter, spray fissante per i colori acrilici, un pennello
  1. intingete il pennello nella colla
  2. disegnate con il pennello imbevuto di colla la forma di un cuore sul retro del tacco (per una maggiore precisione tracciate prima la forma con un gessetto)
  3. riempite di colla il cuore
  4. versateci sopra i glitter
  5. lasciate asciugare
  6. spruzzate un fissante
Se vi sono piaciute queste scarpe date un'occhiata ad un altro paio di scarpe glitterate
oppure guardate tutte le scarpe fai da te

Thursday, February 9, 2012

Valentine's day DIY ideas

STAMP IT
idee san valentino, diy, cloth diy, heart diy, cut out diy, cut out heart,glitter heart diy,heart jumper, valentine's day
black heart tee - sunglasses chain - heart print leggings - potato stamping tool - ipnotic poison perfume

Valentine's day is close, are you planning to wear something to celebrate love?
Here some DIY ideas for you.
Did you know that you can cut out a heart shape out of a potato and obtain a fab stamping tool? You'll just have to dip it into the fabric paint and decorate your clothes with it very quickly.


Il giorno di San Valentino si avvicina. Indosserete un capo che celebri l'amore?
Ecco qualche idea per realizzarlo.
Potrete realizzare un timbro ritagliando la forma di un cuore da un tubero. Basterà intingerlo nel colore per la stoffa e realizzare così dei cuori tutti uguali.

CUT IT OUT
 diy, cloth diy, heart diy, cut out diy, cut out heart,idee san valentino, glitter heart diy,heart jumper, valentine's day
Cut out apple - Cut out heart top - mesh heart top - Asos cut out heart - anatomic heart pendant
Cut out heart shape with scissors to make an unusual top. The black one you see above is covered with a layer of lace mesh fabric. If you want to make one similar see how to create an insert with mesh fabric. Here's a little idea for the table, you can also cut out an heart shape out of an apple.

Ritagliate la forma di un cuore per realizzare un top diverso. Se volete ricoprire il cuore di stoffa trasparente come il top nero qui in alto potrete vedere come realizzare un inserto in tulle qui.
APPLIQUE
 diy, cloth diy, heart diy, cut out diy, cut out heart,idee san valentino, glitter heart diy,heart jumper, valentine's day
glitter jumper - heart trim dress - DIY jumper by soccermomstyle - sequin heart sweater-

heart-Shaped Doughnut Recipe


Cut out an heart shape
  1. from a piece of sequin fabric and sew them on a top
  2. from a  iron on transfer glitter sheet apply it on a shirt.
You can also decorate your clothes with some fancy trims: sew (or glue) them randomly or use them to form an heart shape, have a look at the super cute DIY ruffle heart top by soccermomstyle.


Ritagliate una forma di un cuore da
  1. da un ritaglio di stoffa in paillettes e cucitela su di un top
  2. da un foglio a4 trasferibile in glitter e applicatelo con il ferro da stiro su di un top
Se avete delle trine potete incollarle o cucirle su di un top, date un'occhiata al top che ha realizzato la blogger di soccermomstyle.

Monday, January 30, 2012

Valentine's day heart nails tutorial

valentine's day,valentine's day nails,heart nails, valentine's day diy,fashion diy
avrete bisogno di: occhielli salvabuchi o in alternativa  forbici e scotch carta, smalto

APPLY A COAT OF RED NAIL POLISH

Applicate uno strato di smalto rosso
valentine's day,valentine's day nails,heart nails, valentine's day diy,fashion diy
click onto the image to enlarge it
cliccate sull'immagine per ingrandirla
Sovrapponete gli occhielli salvabuchi sull'unghia (in alternativa ritagliate 20 cerchietti di scotch) in modo da ricreare la forma del cuore. Applicate uno strato di smalto bianco. Aspettate che lo smalto asciughi e rimuovete i cerchietti.


Here's a quick tutorial on how to make the Valentine's day nails. The idea is to overlap reinforcement rings to create the heart shape. If you don't have them you can easily cut out small circles out of paper scotch.


Ecco un veloce tutorial su come realizzare la manicure perfetta per S. Valentino. L'idea è quella di utilizzare gli occhielli salvabuchi per realizzare la forma del cuore.

Friday, December 30, 2011

Fluffy feathers shoes DIY

alexander wang fluffy shoes, alexander wang diy,fluffy shoes diy,feather shoes diy,wedding shoes diy,marras diy,spring shoes diy,pin on decorations,diy shoes

alexander wang fluffy shoes,alexander wang fall 2011,antonio marras spring 2012 shoes,fluffy shoes 2012 spring
the inspiration Alexander Wang heels fall 2011 - Antonio Marras spring 2012

Last summer we talked about the fluffy shoes designed by Alexander Wang for fall 2011 asking if they were wearable or not. We both agreed that they were very dramatic. If you tried to forget about them i'll tell you: the trend of the fluffy shoes is here to stay; in fact during the latest Milano fashion week (read my report of Milano fashion week here) a sassy, fluffy detail appeared again on shoes in the Antonio Marras spring 2012 collection. Feathers are not suitable for daily wear but they can make special a pair of shoes for a evening (maybe new year's eve?), so what if they were detachable? In this fashion diy you'll see how to create a detachable feather clip decoration that can be added on top of your shoes. Since it is detachable it can decorate wedding shoes, an headband, it can be used as a brooch, as a ring, you can pin it wherever you like! You can give a new look to your shoes in minutes! What do you think of the result?


Le scarpe disegnate da Alexander Wang, sono di quelle che dividono le donne in due gruppi: quelle che le amano e quelle che le odiano. Se pensavate che fosse un trend da archiviare vi informo che le scarpe "pelose" sono comparse nelle ultime sfilate di Milano nella collezione di Antonio Marras. Tutte concordiamo siano molto sceniche e magari poco adatte ad essere indossate tutti i giorni, magari solo per una serata speciale (magari proprio Capodanno?). E se fossero rimuovibili? Nel fai-da-te di oggi vi mostrerò come realizzare una decorazione in piume rimuovibile che può essere inserita sulle scarpe. Essendo rimuovibile questa decorazione può essere appuntata su cerchietti,giacche,anelli, dovunque vogliate. Sono necessari pochi step per donare un nuovo look alle vostre scarpe, che ne pensate?