Showing posts with label bracelet diy. Show all posts

Saturday, March 16, 2013

Oversized amethyst crystal bracelet DIY

diy, fashion diy, bracelet diy, diy jewelry, crystal bracelet diy, chanel amethyst crystal bracelet diy, chanel fall 2012 jewelry, pamela love jewelry,
Amethyst crystal armor bracelet DIY

diy, fashion diy, bracelet diy, diy jewelry, crystal bracelet diy, chanel amethyst crystal bracelet diy, chanel fall 2012 jewelry, pamela love jewelry,

My mom calls my creations like the bugnato clutch (it's from 2010, it's a matter of style vintage now!) or the spiked earrings things from "The day after" implied the Armageddon because to her they look like things coming from some sort of sci-fi movie set in a future in which mankind lives in a post-industrial new middle-ages. Always wondered if this is supposed to be a compliment or an insult, but nevermind... Chanel fall/winter 2012 jewelry perfectly fit in this category and in fact I like it a lot. There you are a DIY bracelet inspired by it forged in the purest metal decorated with the most perfect amethysts...who am I kidding? It's made with spray paint and rocks from my garden. Do you dare to discover how you can make one? Then, command your computer to load the page hidden inside this link.


Wednesday, February 13, 2013

Infinite love bracelet DIY

valentine's day gift idea, gift idea, infinite math, bracelet diy, fashion diy, diy

Here's another Valentine's day little jewel. This bracelet doesn't have any closure, well if you receive a gift that is a symbol of infinite love you shouldn't take it off...just kidding. You can make it long enough to put it on or add a closure next to the infinite symbol. I think it's a nice alternative to hiding it on the other side of the bracelet. If you think this bracelet can make a nice last minute gift idea I suggest you to pair it with these funny nerd Valentine's cards I saw on true blue me&you.

More Valentine's day diy ideas here.


Cut a piece of metallic wire and twist it 


Curl it in the shape of eight and cut away the loop


Connect the infinite symbol to a piece of chain with two jump rings.
Regulate the lenght so you can put it on without using a closure or insert a clasp to connect to the infinite symbol.

Thursday, September 20, 2012

Recycle & reuse : how to make a crystal bracelet with vase fillers

The thing I enjoy the most is take something around the house and transform it in a wearable piece.
Today I'll show you how to use then so called vase fillers. They are irregular pieces of plastic that look like crystals that are used mostly as a decoration element.  I enjoy wearing crystal clear pieces of jewelry right now so the only thing I had to do is pierce the plastic crystals turning them into beads and insert them in a elastic piece of thread. Voilà a new bracelet is done!

You'll need
elastic thread
a driller


La cosa che più mi diverte è utilizzare degli oggetti trovati qua e là per realizzare capi e accessori indossabili.
Oggi prenderemo in prestito dal salotto dei cristalli in plastica per realizzare un bracciale. Li potete trovare nei negozi tra i complementi d'arredo, sono utilizzati principalmente a scopo decorativo per riempire ciotole e vasi.  Basterà forarli per trasformarli in perline irregolari. A quel punto non resterà che infilarle in un filo elastico per completare il bracciale

Vi serviranno
cristalli in plastica
filo elastico
un trapano
crystal rocks vase fillers

 I used heat to pierce them but you can also use a driller. Don't worry if you pierce them in different spots because this will help you to give movement to the bracelet. Be very careful when you use these kind of tools.

Potete usare un trapano per forarle oppure un saldatore. Fate molta attenzione nell'usare entrambi gli utensili.
 Non importa se i fori saranno in punti diversi. anzi contribuiranno a creare movimento.

Once pierced they can be inserted in a plastic thread.

Una volta forate infilate le perline nel filo elastico e annodatelo.

Tuesday, August 21, 2012

Reinvent&Reuse : neon phone coil bracelet tutorial

neon bracelet, neon diy, spray paint diy, fashion diy, coil bracelet, bracelet diy, jewelry diy, summer diy

You can find many things around the house that can be reinvented with creativity and transformed in a unique piece of wearable fashion. 
Today I used a piece of phone coil cable to make a fun neon summer bracelet.
You'll need:
  • coil wire
  • neon spray paint
  • a stapler
Molti oggetti che abbiamo in casa possono essere totalmente trasformati ed avere una seconda opportunità di essere utilizzati. Guardandoli da un'angolazione diversa si possono intuire delle potenzialità inespresse ed immaginare destinazioni d'uso del tutto nuove. Con un po' di creatività molti di essi possono diventare degli accessori moda originali.
Oggi trasformeremo un cavo telefonico spiralato in un bracciale estivo.
Vi serviranno:
  • un cavo telefonico
  • vernice spray in tonalità neon
  • una spillatrice


Cut a phone telephone coil cable . Wrap it around your wrist to take the measurement.

Avvolgete il cavo intorno al polso per prendere la misura e tagliate il cavo.
 
Close the loop. Overlap a tiny piece of cord and pin it with a stapler twice. One on each side.

Chiudete il bracciale. Sovrapponete una piccola porzione del cavo e bloccatelo con la cucitrice. Fissate un punto su ogni lato.

Here's a close up look.
Ecco la chiusura vista da vicino.

neon bracelet, neon diy, spray paint diy, fashion diy, coil bracelet, bracelet diy, jewelry diy, summer diy
Spray it!
Spruzzate il bracciale con la vernice neon.

Wednesday, August 8, 2012

1 jewel 2 ways to wear it:how to turn a bracelet into an anklet

tips and tricks, fashion diy, bracelet, diy anklet
Monogram bracelet - DIY anklet

New trends emerge every day. Do we necessarily have to buy new stuff to stay stylish? No.
Let me show you something. This is a little trick to turn a bracelet into an anklet anytime you want.
Anklets are cool right now, they are cool to wear during summer but maybe you already have the perfect bracelet that could be a lovely anklet but unfortunately it's too short to be one. This is a trick to add that extra lenght to your bracelet. It's easy and quick and even better the transformation can be undone in a snap.


the bracelet - a clasp - chain - 2 jumprings
  • Measure the extra lenght you need
  • connect two jumprings at the end of the chain
  • connect a clasp to one end
  • You've already done!
  • Connet the extra piece to the clasp of the bracelet and you've successfully turned it into an anklet
  • Go to the beach to show it!
  • You have now two clasps. Disconnect the extra piece and you've got your bracelet back.
The extra piece can be used to add lenght to any bracelet so if you've got ten bracelets you virtually can have ten anklets.
This method can also be used with other pieces of jewelry as well.

 This is my one of my favorite summer necklace. It's colorful and sparky. It's already a bold piece but I wish I could wrap it twice around my neck to get a even richer effect. Unfortunately it's not long enough to do that.
The trick comes handy again

Here's my richer necklace.

Saturday, August 4, 2012

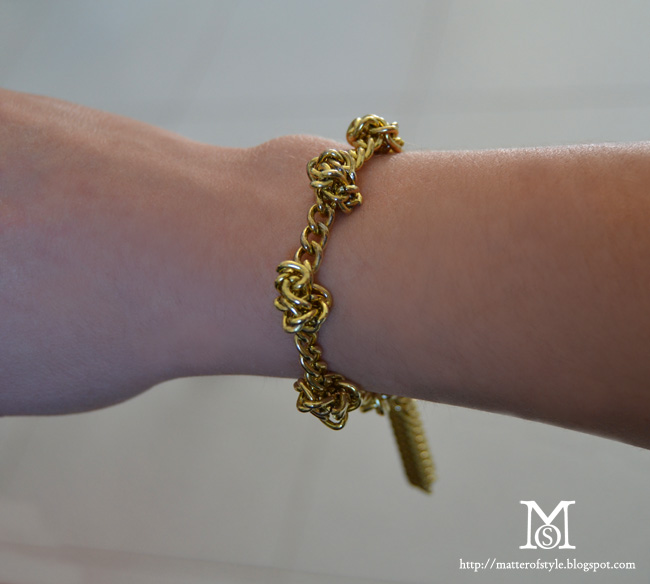
Vintage inspired knot and chain bracelet DIY


I liked the idea of a chunky chain bracelet that would look a bit like a vintage piece of jewelry so I made this bracelet. using a very easy technique to make it. This bracelet is made knotting the chain like it was a piece of rope and then I adding a sassy little tassle at the end that will swing as you move.

you'll need:
pliers
chain
metallic wire
clasp

knot the chain 

cut a few pieces of rope

join them together with a jumpring

connect the tassle at the end


block the knots with a tiny piece of metallic wire

Sunday, July 1, 2012

Build your arm party: How to make istant macrame bracelets

how to, arm party, arm party diy, bracelet diy, summer bracelet, macrame bracelet diy, diy, my diy, bracelet diy, trim bracelet

These trims were just too cute to seat in a box. They can be quickly transformed into summer macrame bracelets and make a nice arm party ( to stack your arms with bracelets see also this arm party  tutorial!).
All you have to do is
  • choose any trim you like
  • cut them the size of your wrist
  • add a fastening
  • and you've done
Speaking of fastenings you have more than one option. You can glue (or sew) a snap button on the trim or you can make a small decorative fastening with just a bead and thread. I'll show you how.

Date un'occhiata agli scaffali della merceria. Troverete tante trine di ogni tipo che possono essere trasformate velocemente in deliziozi braccialetti macramè
  • misurate il vostro polso
  • tagliate le trine della lunghezza giusta
  • aggiungete una chiusura e il braccialetto è pronto.
Per chiudere i braccialetti basterà un bottone automatico cucito o incollato all'estremità della trina. Oggi vi farò vedere come realizzare velocemente una chiusura decorativa usando solo del filo e una perlina.
D'estate le braccia sono in primo piano quindi non dimenticate di vestirle con gli accessori. Più sono i braccialetti meglio è. Imparate a farne altri cliccando qui.

Create a few loops with thread - Fate passare il filo più volte nella trina
then make simple knots around those loops you'll create a button hole - Poi fate dei semplici nodi attorno al filo
on the other side insert a bead and knot the thread - Dall'altro lato inserite una perlina e annodate il filo
Insert the bead inside the loop and the fastening is done. - La perlina entra nell'asola e crea una semplice chiusura
White trims can be painted with acrylic colors - Divertitevi a tingere le trine bianche con i colori acrilici
here's how  fastenings look once finished. Nice and decorative. - Ecco come appaiono le chiusure allacciate

Monday, November 7, 2011

Versace inspired bracelet DIY

 Gold and chains are the perfect ingredients for a luxury bracelet. I istantly loved the bracelet designed by Donatella Versace for H&M and while we wait for the collection to finally reach the stores, why don't make our version of it? You only need gold chains, a wide clasp and a big button!

L'oro o almeno il dorato è l'ingrediente indispensabile per un gioiello che abbia un aspetto lussuoso. Tra gli accessori disegnati da Donatella Versace per il marchio H&M uno in particolare mi ha colpito subito ed è il bracciale con le catenelle. Mentre aspettiamo che finalmente la collezione venga distribuita nei negozi ecco un tutorial veloce che reinterpreta il braccialetto. Vi servono: catenelle, una chiusura e un bottone e il bracciale è presto fatto.


the inspiration:Versace fo H&M
 il bracciale Versace for H&M
 
Aren't buttons beautiful? They can make incredible jewellery almost on their own. I found this big gold button at the haberdashery, you can choose any button you like.The variety is almost infinite and you'll be tempted to buy them all.
Here's the list of supply needed: a piece of metallic wire, a gold chain ,a button, a clasp like the ones you see below. They are pretty common but my local shop didn't have it so I had to diy my own with a metallic cap.

I bottoni sono davvero bellissimi e possono diventare dei gioielli unici. Io ho acquistato questo grande bottone dorato, voi scegliete quello che più preferite. La scelta è davvero molto ampia e una volta entrate in merceria sarete tentate di comprarli tutti!
Prendete: un filo metallico, una catenella dorata, un bottone, una chiusura per bracciale come quelle che vedete qui sotto. Il mio negozio di riferimento le aveva finite quindi ho dovuto "fabbricare" la mia con un un tappo di lamiera.


I just laid down the chain and tried the button on: as you can see the bracelet looks already done.
Measure your wrist and cut the chain in pieces of the same lenght; then attach the botton at the center with a piece of metallic wire. Using the pincher press the clasp at the ends to block the chains and you've done!

Ho sistemato la catena sul tavolo e ci ho poggiato sopra il bottone. Come potete vedere il bracciale sembra già fatto! Misurate il polso e tagliate la catenella in pezzi della stessa lunghezza. Legate il bottone alla catenella con un pezzo di filo metallico. Inserite la chiusura e schiacciatelasulle catenella. Avete finito!


what i did to make the clasp: I cut 2 rectangular pieces from the cap then I pierced it using a nail. I used a hook  to connect the chain to the metallic plate an then i pressed it down using a pincher.
Come ho fatto a far la chiusura? Ho ritagliato due rettangoli dal tappo e li ho bucati usando un chiodo. Con dei gancetti ho connesso la lamiera alle catenelle e ho poi schiacciato la lamiera con la pinza.

Sunday, May 8, 2011

Last minute DIY gift idea 4 your mom: rope bracelet


Today is mother's day! Did you remember to take a gift for her or you spent these days shopping for yourself? Shame on you! ;) You've been selfish but i'll give you the chance to amend with this last minute idea. You'll be able to craft a gift with what you have at home!


Oggi è la festa della mamma! Vi siete ricordati di comprarle un regalo o avete fatto shopping solo per voi? Ah,siete stati egoisti! :P Ma oggi vi darò l'oppurtunità di riscattarvi. Anche se è domenica potrete preparare un regalo dell'ultimo minuto per mammuzza bedda con quello che avete a casa!

You'll need:
Avrete bisogno di:


the proof of guilt= bag handles from your shopping bags
la prova della vostra colpevolezza: i manici delle buste dello shopping

some beads
a ribbon or a shoe lace

that's all!

qualche perlina
un nastrino di raso o un laccio di scarpe


wave the robe a bit
date al cordino una forma ondulata


make a loop and insert the needle into the rope
add a bead
insert the needle into the rope again

fate un cappio
inserite l'ago nella corda
inserite una perlina
infilate l'ago nuovamente nella corda


make another loop and insert the needle into the rope

fate un altro cappio e inserite l'ago nella corda


continue inserting a bead

continuate inserendo una perlina

repeat the steps

ripetete il procedimento

now repeat the same steps on the other side

ripetete il procedimento sull'altro lato

sew one bag handle after the other and complete the bracelet
use a ribbon or a shoe lace to make the closure

cucite un manico dopo l'altro e completate il braccialetto
usate un nastrino di raso o un laccio di scarpe come chiusura


You've done!
E' fatto!

Do you like it?
Happy Mother's day to all moms!

Vi piace?
Tanti auguri a tutte le mamme!