Showing posts with label ball chain. Show all posts

Friday, February 1, 2013

Make Baroque jeans and speed up your DIY with a simple trick

ball chain, diy, fashion diy, my diy, baroque, baroque jeans diy,baroque diy, free pattern, tutorial, how to,
Balmain inspired baroque jeans DIY + free pattern

ball chain, diy, fashion diy, my diy, baroque, baroque jeans diy,baroque diy, free pattern, tutorial, how to,
Balmain inspired baroque jeans DIY

Excess, luxe, in a word baroque. We all liked Balmain collection heavily covered with pearls. Luxurious, but also contemporary thanks to a western vibe. Those magnificent dresses required hundreds of hours to be made, each pearl has been sewed by expert hands. Don't worry there is a way to do it at home cutting down the time needed to embellish a cloth baroque style thanks to a simple trick, one of the diyers best friend: the ball chain. No bead stringing is needed and neither sewing pearls one by one. Ball chain can be cut anywhere just put it down your cloth and fasten it with a stitch every couple of beads or so and the result is a resistant decoration. If you have the beading foot for the sewing machine you can also sew the ball chain directly on the cloth with zig zag stich.

 Like the decoration on my jeans? Get my free pattern and  


Had fun with ball chain? See more DIY project with ball chain here.

Thursday, May 17, 2012

Build your arm party : How to make 5 bracelets in 10 minutes

arm party diy, friendship bracelets, diy, my diy, fashion diy, diy bracelets, rope bracelets, scarf bracelet, ball chain bracelet, crystal chain bracelet, yarn bracelet, braided bracelets
Arm party
arm party diy, diy, my diy, fashion diy, diy bracelets, rope bracelets, scarf bracelet, ball chain bracelet, crystal chain bracelet, yarn bracelet, braided bracelets

Today I would like to show you 5 different techniques to make some nice and easy bracelets. I wanted new bracelets and a lot of them so I made these very quickly. The best thing about these bracelets is that if you're crafty you'll make them for free because they can be made with what you have in your stash:left-over pieces from other DIY projects, little pieces of ropes, some yarn and so on. These bracelets are quick to make and you can have fun making them in every color!

Let's start!

arm party diy, diy, my diy, fashion diy, diy bracelets, rope bracelets, scarf bracelet, ball chain bracelet, crystal chain bracelet, yarn bracelet, braided bracelets, how to make a bracelet, jewelry diy, how to,

Yarn bracelet : I made a tiny loop with the rope, blocked with thread and needle and then I just wrapped the colored yarn around. 

arm party diy, diy, my diy, fashion diy, diy bracelets, rope bracelets, scarf bracelet, ball chain bracelet, crystal chain bracelet, yarn bracelet, braided bracelets, how to make a bracelet, jewelry diy, how to,

Crystal bracelet : I made a loop with the rope and blocked it with thread and needle then I put the crystal chain over the rope and I wrapped the yarn around both. The crystal chain will be blocked in place.

arm party diy, diy, my diy, fashion diy, diy bracelets, rope bracelets, scarf bracelet, ball chain bracelet, crystal chain bracelet, yarn bracelet, braided bracelets, how to make a bracelet, jewelry diy, how to,

Ball chain bracelet: I made a loop with the rope and blocked it with thread and needle then I put the ball chain over the rope and I wrapped the yarn around both. The ball chain will be blocked in place.

arm party diy, diy, my diy, fashion diy, diy bracelets, rope bracelets, scarf bracelet, ball chain bracelet, crystal chain bracelet, yarn bracelet, braided bracelets, how to make a bracelet, jewelry diy, how to,

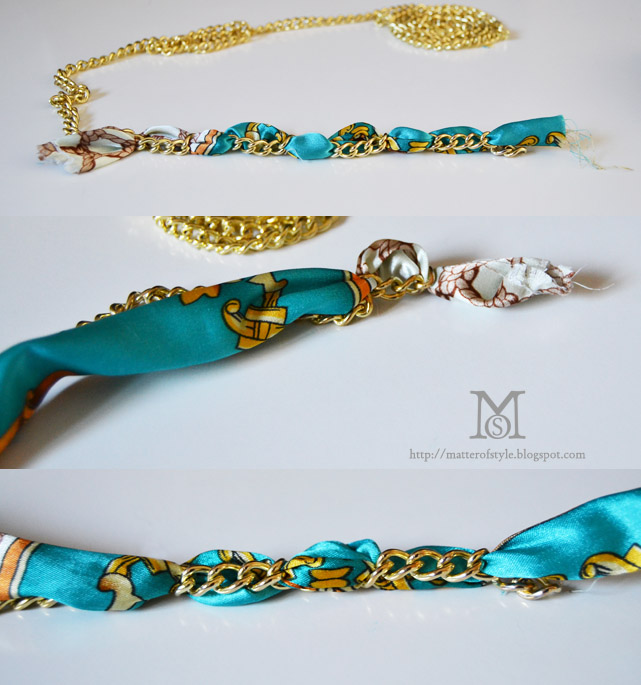
Scarf and chain bracelet: I used a piece of scarf left from the D&G scarf dress, I cut a band of it and then I inserted alternatively in and out of the rope . I cut the band larger than the rope to get the scarf effect.

arm party diy, diy, my diy, fashion diy, diy bracelets, rope bracelets, scarf bracelet, ball chain bracelet, crystal chain bracelet, yarn bracelet, braided bracelets, how to make a bracelet, jewelry diy, how to,

Braided bracelet :  I cut several pieces of colored yarn; I knotted them together - I divided them in three parts then I braided it. I connected the braid to the rope always inserting the part on the left into the rope with the help of a crochet.

 When you've done add a clasp to every bracelet and you're ready to go!

Tuesday, March 20, 2012

Tribal egyptian necklace DIY

MY DIY, egyptian necklace diy,tribal necklace diy,fashion diy, fashion DIY, necklace diy, beaded necklace diy,tutorial,how to, do it yourself

Level after level, yesterday we saw how to master the safety pin necklace technique. Today I want to show you how to make an egyptian inspired necklace using just a beaded chain, colored beads and metallic wire. I chose these items because they were available in my stash but you can easily substitute them with safety pins and a box of gold beads to fill the space between safety pins.  In case you're wondering where you can find the beaded chain, do not take it from the box of Christmas decorations...like I did.
See the tutorial after the jump.

Dopo il post di ieri avete tutte le informazioni necessarie per specializzarvi in bigiotteria realizzata con le spille da balia. Oggi vi mostrerò come realizzare un collier di ispirazione egizia utilizzando del filo metallico e un catenella di perline, tutti oggetti che avevo in casa e che potete tranquillamente sostituire con le spille da balia e una scatola di perline dorate da infilare nel filo tra una spilla e l'altra.


MY DIY, egyptian necklace diy,tribal necklace diy,fashion diy, fashion DIY, necklace diy, beaded necklace diy,tutorial,how to, do it yourself
Una catenella di perline da non sottrarre allo scatolone delle decorazioni natalizie come ho fatto io
MY DIY, egyptian necklace diy,tribal necklace diy,fashion diy, fashion DIY, necklace diy, beaded necklace diy,tutorial,how to, do it yourself
Inserite delle perline in un filo metallico
MY DIY, egyptian necklace diy,tribal necklace diy,fashion diy, fashion DIY, necklace diy, beaded necklace diy,tutorial,how to, do it yourself
Curvatene gli estremi con una pinza formando delle cappioline
MY DIY, egyptian necklace diy,tribal necklace diy,fashion diy, fashion DIY, necklace diy, beaded necklace diy,tutorial,how to, do it yourself
Piegate la catena di perline in due (lasciate il capo più lungo da una parte,  e agganciate l'elemento tra i due fili

MY DIY, egyptian necklace diy,tribal necklace diy,fashion diy, fashion DIY, necklace diy, beaded necklace diy,tutorial,how to, do it yourself
Continuate ad agganciare le perline fino ad terminare la prima fila.
MY DIY, egyptian necklace diy,tribal necklace diy,fashion diy, fashion DIY, necklace diy, beaded necklace diy,tutorial,how to, do it yourself
Piegate ancora il filo dorato per aggiungere una seconda fila di perline
MY DIY, egyptian necklace diy,tribal necklace diy,fashion diy, fashion DIY, necklace diy, beaded necklace diy,tutorial,how to, do it yourself
Man mano che il collier cresce in ampiezza ricordatevi di saltare una perlina dorata ogni tanto, vi permetterà di mantenere la collana piatta!