Showing posts with label free pattern. Show all posts

Friday, February 1, 2013

Make Baroque jeans and speed up your DIY with a simple trick

ball chain, diy, fashion diy, my diy, baroque, baroque jeans diy,baroque diy, free pattern, tutorial, how to,
Balmain inspired baroque jeans DIY + free pattern

ball chain, diy, fashion diy, my diy, baroque, baroque jeans diy,baroque diy, free pattern, tutorial, how to,
Balmain inspired baroque jeans DIY

Excess, luxe, in a word baroque. We all liked Balmain collection heavily covered with pearls. Luxurious, but also contemporary thanks to a western vibe. Those magnificent dresses required hundreds of hours to be made, each pearl has been sewed by expert hands. Don't worry there is a way to do it at home cutting down the time needed to embellish a cloth baroque style thanks to a simple trick, one of the diyers best friend: the ball chain. No bead stringing is needed and neither sewing pearls one by one. Ball chain can be cut anywhere just put it down your cloth and fasten it with a stitch every couple of beads or so and the result is a resistant decoration. If you have the beading foot for the sewing machine you can also sew the ball chain directly on the cloth with zig zag stich.

 Like the decoration on my jeans? Get my free pattern and  


Had fun with ball chain? See more DIY project with ball chain here.

Friday, November 23, 2012

The cape coat DIY reloaded: Finishing

cape coat sew along, cape coat diy,cape diy
The cape coat diy

cape coat sewalongCape coats are trending right now but you already know it!
A lot of you are making the DIY cape coat  I shared with you last winter season!
Since I received many questions about the finishing of the coat today we talk deeper about it.
These details are up to you. The coat can be done with one seam and will work without the collar but you can choose the level of customization you want based on your skills and taste.

This is what I did to finish my coat.


There is also another freebie for you, it's the corean collar free pattern I added to the coat.

I see dogtooth paired with brights in a lot of shops lately so I guess my cape will still be trendy this year! :D


For those of you that don't know anything about this cape coat you can download the free pattern here then follow the step by step tutorial to make it.


Le mantelle sono tornate di moda ma voi lo sapete già! Molte di voi infatti ne stanno realizzando una con il modello che ho condiviso con voi l'anno scorso. Avendo ricevuto molte domande sulle rifiniture oggi torniamo a parlarne.
La mantella può essere finita cucendo solo le spalle senza dover aggiungere colli o bottoni, le rifiniture poi dipenderanno dai vostri gusti.
Alla lista dei modelli scaricabili gratuitamente oggi si aggiunge anche il colletto alla coreana che ho realizzato per la mantella.
Se non avete mai sentito parlare di questa mantella potete scaricare qui il modello gratuito e poi seguire le spiegazioni per realizzarla.


 What I used:

  • 2,5 meters  of knitted dogtooth wool for the coat
  • same amount of torquoise taffeta lining
  • torquoise pannolenci for details 
  • 3 black buttons

 
After sewing the shoulders here's how to refine
  • The arm slashes
  • The collar
  • The lining
  • the buttons

Avrete bisogno di:
  •  2,5 metri di stoffa (la mia è di lana)
  • stesso metraggio di fodera
  • pannolence turchese per le rifiniture
  • 3 bottoni neri
Dopo aver cucito le spalle della mantella ecco come rifinire 
  •  le aperture per le braccia
  • il colletto alla coreana
  • la fodera
  • i bottoni

Refining the arm slashes


Cut the arm slashes
Tagliate le aperture per le maniche


Cut this triangle at the top of the slash

Tagliate un triangolo alla sommità del taglio come in figura

Fold the edges on the back

Ripiegate sul rovescio i bordi


It will look like this on the right side

Ecco come apparirà l'apertura a dritto


Cut two strips of torquoise pannolenci  (slightly longer than the slash) and put them close to each other on the inside of the slash. Let them touch so the slash will appear closed untill you put your arms into it.

Tagliate due striscie di pannolence poco più lunghe dell'apertura e posizionatele l'una affianco all'altra sul rovescio. Si devono toccare così l'apertura appare chiusa.


This is like it will look on the back
Ecco come appaiono sul rovescio

Finishing the collar

 
I put a adhesive facing behind the pannolenci - Ho stirato una teletta dietro al pannolence


Fold the wool fabric in half and cut one collar shape 
Cut from the collar pattern the 1 cm edge

Usate il modello una volta  sulla stoffa uguale alla mantella, il modello è metà colletto.
Ritagliate il bordo di un centimetro dal modello (segnato sul disegno) e ritagliatene la sagoma sulla stoffa.
La sagoma più grande tagliatela in pannolence.


Cut the big shape from pannolenci
Cut the 1 cm strip from wool
Sew the two pieces together 
Put the two collars one onto the other with the right sides together and sew the outer edge.
You get a pocket with one side open.

Where to sew the collar

As you can see from the finished cape pics the collar remains open at the center, it doesn't go over the row of buttons.

Cucite i due pezzi insieme. Mettete dritto contro dritto i due colletti e cuciteli insieme. Otterrete una tasca aperta in fondo. 

Dove cucire il colletto?
Come potete vedere dalle immagini della mantella finita, il colletto rimane aperto al centro cioè non si sovrappone alla striscia centrale in cui sono alloggiati i bottoni.  Questa striscia è indicata sul modello al centro davanti.

Adding the lining


Use again the pattern to cut another cape, just like you did with the coat

Usate il modello della mantella nuovamente sulla fodera.
Ritagliate un'altra mantella e cucitela.


Put the wrong sides of the fabrics together and stitch the lining on the edges of the coat, all around the hem and along the shoulder seam so the lining won't move.

Ora fate combaciare le due mantelle in modo che i due lati dritti rimangano visibili e cucite la fodera lungo tutto il bordo della mantella.
Cucite anche le spalle cosi la fodera non si muoverà.


Add the buttons


On the pattern there is a vertical line at the center front, that is the where you place the buttons.
 Try the coat on and use pins to decide where to place buttons
Place one just below the neck
Place the other two at a distance of 18 cm each.
Buttons go on the left side of the coat and the button holes on the right side.
Make button holes with your sewing machine or by hand (see how here) .

Sul modello c'è una striscia verticale al centro davanti: è dove andremo a mettere i bottoni.
Indossate la mantella e con gli spilli decidete dove mettere i bottoni.
Mettetene uno appena sotto al collo e gli altri due a distanza di 18 cm l'uno dall'altro.
I bottoni vanno sul lato sinistro mentre le asole sul lato destro.
Potete realizzare le asole con la macchina da cucire (leggete il manuale di istruzioni della macchina) oppure a mano (guardate come fare qui)


Friday, November 2, 2012

How make a top inspired by comics + free pattern

diy, fashion diy, fabric marker, glitter sheet, fashion ispired by comics
comics inspired top

"Everyone wants garments to be superheroes. This 'fill in the blank' should save your day, your week, your year." said Phillip Lim introducing his pre-fall 2012 collection inspired by Roy Lichtenstein the american artist famous for his giant cartoon pictures.
And while London fashion week opened with an capsule collection dedicated to Minnie Mouse, Iceberg pick chosen Valentina, a cartoon character of the 60's) as his muse.
Fashion fell in love with colors and graphical prints inspired by comics.
Are you joining the mania?
Today I'll show you how to decorate a t-shirt or a blouse with a cartoon drawing. You can download the free pattern here and continue to


Monday, October 15, 2012

How to make a leather cut out necklace + Download the FREE PATTERN

laser cut necklace, diy, fashion diy, leather necklace, cut out necklace, free pattern, download, style.it, intaglio, embroidery
Laser cut necklace
laser cut necklace, diy, fashion diy, leather necklace, cut out necklace, free pattern, download, style.it, intaglio, embroidery
Download the FREE PATTERN here
 Laser cut clothes invaded fall pret a porter. The new embroidery has been released from the richness of the decorations and became easier to wear. Leather makes it modern and fresh. The see through effect is chic because it shows the right amount of skin.
Even without an expensive laser cut machine we can obtain the same effect with a pair of classic scissors.
I made exclusively for you an original necklace and you can download the free pattern here.

Tuesday, February 7, 2012

The cape coat DIY + free pattern


cloth diy, diy, cape coat pattern, free pattern, autumn winter 2011, dogtooth, cape coat diy, fashion DIY

cloth diy, diy, cape coat pattern, free pattern, autumn winter 2011, dogtooth, cape coat diy, fashion DIY
bag by Carpisa similar one: black croc bag by Miss Selfridge

I found a way to join two winter trends: the cape coat and the dogtooth pattern. I found this grey and black dogtooth fabric and I decided to give it some character adding a few torquoise accents. As you can see intricate patterns often look good with bright colors. If you like this cape you can download the pattern, I digitalized the one I made especially for you. Believe it or not you'll only need to sew the shoulders.

Ho trovato un modo di coniugare due trend invernali: la mantella e il pied de poule. Per realizzare questa mantella ho utilizzato una stoffa grigia e nera e ho deciso di sottolineare alcuni dettagli con del pannolence turchese. Come potete notare le stampe vengono spesso valorizzate dall'accostamento con i colori vivaci. Ho digitalizzato per voi il modello che ho realizzato e potrete salvarlo sul vostro computer.


cloth diy, diy, cape coat pattern, free pattern, autumn winter 2011, dogtooth, cape coat diy, fashion DIY
find similar boots here
cloth diy, diy, cape coat pattern, free pattern, autumn winter 2011, dogtooth, cape coat diy, fashion DIY
I added a torquoise lining too.
I wore a blue silk scarf, you can find a similar one here

cloth diy, diy, cape coat pattern, free pattern, autumn winter 2011, dogtooth, cape coat diy, fashion DIY
Download the cape coat free pattern and print it
*Update* alternate download link
The pattern is one half of the cape.
Fold the fabric in half and pin the pattern on.

Il modello riproduce metà della mantella

cloth diy, diy, cape coat pattern, free pattern, autumn winter 2011, dogtooth, cape coat diy, fashion DIY
how the shoulder look once sewed
cloth diy, diy, cape coat pattern, free pattern, autumn winter 2011, dogtooth, cape coat diy, fashion DIY
I also added a corean collar- get the corean collar free pattern

Tuesday, January 31, 2012

Vuitton inspired metal peter pan collar

fashion diy,diy,diy peter pan collar, peter pan collar, metal peter pan collar,vuitton peter pan collar, no sew,tutorial

Peter Pan collars are an irresistible DIY. There's only one collar out of our reach, the king of collars, the Vuitton metal peter pan collar. Impossible to DIY. without using metal? No, I found a way to make one similar using some quite strange items : felt, a blow dryer and mirror paper.
Felt it's a very interesting material because it becomes moldable when exposed to heat and keeps the shape when cool. We'll use the blow dryer to shape the felt.
The mirror paper it's a self adhesive stiff paper that looks like mirror, we'll use it to give the metal effect to our collar.
So grab the blow dryer and let's see how I made the collar.

I colletti Peter Pan sono un'irresistibile DIY. Solo uno era rimasto fuori dalla portata di noi ragazze, il re dei colletti, il colletto in metallo Vuitton. Impossibile da riprodurre senza utilizzare il metallo? Invece no, ecco come realizzarne uno simile utilizzando dei curiosi materiali : del feltro, della carta specchio e un phon.
Il feltro è un materiale molto interessante che diventa malleabile quando esposto al calore e mantiene la forma una volta raffreddato. Utilizzeremo quindi il phon per modellarlo. 
La carta specchio è un tipo di carta rigida e adesiva con la superficie riflettente, la useremo per creare l'illusione della superficile metallica.


This is what you need:
fashion diy,diy,diy peter pan collar, peter pan collar, metal peter pan collar,vuitton peter pan collar, no sew,tutorial
get the felt that is sold in stiff sheets or it won't keep the shape
Vi serviranno: un foglio di feltro rigido, un foglio di carta specchio, una cerniera, un phon, della colla
fashion diy,diy,diy peter pan collar, peter pan collar, metal peter pan collar,vuitton peter pan collar, no sew,tutorial
the inspiration Vuitton metal Peter Pan collar
fashion diy,diy,diy peter pan collar, peter pan collar, metal peter pan collar,vuitton peter pan collar, no sew,tutorial
get the pattern here: peter pan collar free pattern

scaricate il modello del colletto peter pan  ritagliate la forma in feltro e incollate la cerniera sul retro
fashion diy,diy,diy peter pan collar, peter pan collar, metal peter pan collar,vuitton peter pan collar, no sew,tutorial
when it's warm lift up the rounded edges and the inner border, let it cool for a second and see it keeping the shape

usate il phon per scaldare il feltro, appena sarà malleabile modellatelo con le mani: alzate il bordi esterni verso l'alto e il bordo interno all'infuori, dategli tridimensionalità
fashion diy,diy,diy peter pan collar, peter pan collar, metal peter pan collar,vuitton peter pan collar, no sew,tutorial
Usando il modello ritagliate la carta specchio
fashion diy,diy,diy peter pan collar, peter pan collar, metal peter pan collar,vuitton peter pan collar, no sew,tutorial
until you get the shape that you want.
To be sure that the felt will keep the shape forever spray it with a sealant.

Incollate la carta specchio sul colletto in feltro e continuate a scaldare il feltro fino ad ottenere la forma desiderata. Alla fine spruzzate con un fissante il feltro per essere sicure che non perda più la forma.

Monday, January 23, 2012

The playful clear bag filled with loose flowers DIY

fashion diy,diy,bag diy,flower bag,spring 2013 bag,free bag pattern,clear clutch bag diyfashion diy,diy,bag diy,flower bag,spring 2013 bag,free bag pattern,clear clutch bag diy

fashion diy,diy,bag diy,flower bag,spring 2013 bag,free bag pattern


 Maybe trees are not in bloom yet but I still want to carry spring spirit with me today. Anticipating the start of the warm seasons (and spring trends) I DIY -ed this bag filled with bright colored flowers. It's a jelly bag with a playful feel, in fact I inserted into the back of the bag some loose flowers that move freely as we walk. Basically the pattern of the bag changes continuously! Do you like it? See how I made it and download the freebie I made for you!

Forse dovremo attendere ancora molto l'arrivo delle stagioni calde ma non ho potuto fare a meno di aggiungere un tocco di colore al mio guardaroba realizzando questa borsetta decorata con fiori dai colori sgargianti. L'idea è quella di creare un accessorio giocoso: il retro della borsetta è infatti riempito di fiori che sono liberi di muoversi, realizzando quindi una borsa la cui stampa varia continuamente. Vi piace? Guardate come è stata realizzata e scaricate il freebie che ho preparato per voi.

fashion diy,diy,bag diy,flower bag,spring 2013 bag,free bag pattern

fashion diy,diy,bag diy,flower bag,spring 2013 bag,free bag pattern
stampate i fiori su un cartoncino

GET THE FREE FLOWER FRINT HERE : FLOWERS1 FLOWERS2

Scaricate qui la stampa floreale:  Fiori1 Fiori2

Ritagliate i fiori e se volete spruzzateli di plastificante

Stampate ancora i fiori, questa volta su carta e incollateli casualmente sulla plastica
Ritagliate la plastica come descritto nel modello e cucite la borsa: prima di cucire i lati inserite nella tasca sul retro i fiori in cartoncino
See other DIY bags
Cliccate per vedere  altre borse fai-da-te 

Sunday, December 18, 2011

The flapper dress DIY

flapper dress diy,diy,free pattern,tutorial

flapper dress diy,diy,free pattern,tutorial

Christmas is approcching and we're putting together our party outfit.
Last week we diy-ed a our glitter shoes and now it's time to diy our party dress.
The dress I made it's a flapper dress in a blush pink color and I used a sheer crepe georgette fabric.
If you saw the latest runways you maybe know that the flapper dress will be really trendy next spring, so we're making a dress we can wear a lot next season. See the step by step tutorial after the jump.

 Natale si avvicina ed è tempo di mettere insieme il nostro outfit. La settimana scorsa abbiamo realizzato le scarpe, ora è il momento di cucire il vestito che ho realizzato in stile charleston scegliendo un colore rosa cipria. Se avete seguito le ultime sfilate saprete che i ruggenti anni venti stanno per tornare di gran moda la prossima primavera quindi il vestito di oggi è pronto per essere sfoggiato durante il corso della prossima stagione. Troverete il tutorial step by step di seguito. 


spring 2012,flapper dress,gucci,etro,cavalli,alberta ferretti
low waist flapper dresses for spring 2012: Alberta Ferretti, Etro, Roberto Cavalli, Gucci
flapper dress pattern,flapper dress diy,diy,free pattern
The dress is basically a tube wide as your hips; the back is made a little smaller to obtain a slimming effect, sew the two rectangles at the sides and at the shoulders leaving opened the armholes and the neckline
Il vestito è in pratica un tubo della larghezza dei vostri fianchi, il dietro è tagliato più piccolo ottenendo un effetto snellente. Cucite i due rettangoli ai lati e sulle spalle lasciando aperte le maniche e  lo scollo.
to wear the dress easily slash the back at the middle and add a button 
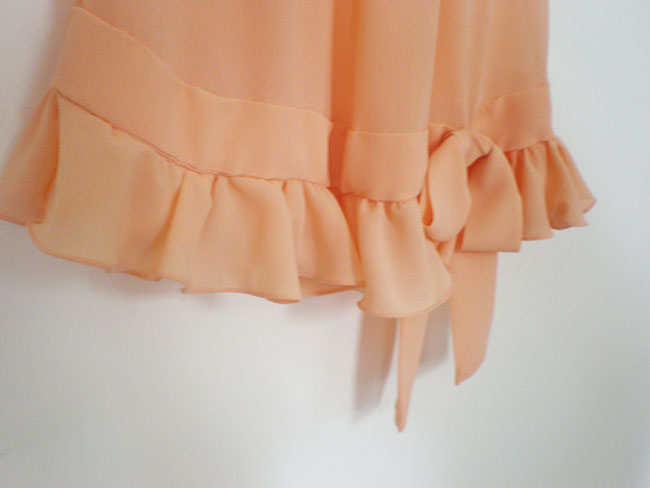
You've now made the dress. I then added a funny ruffle at the bottom and a decorative belt
Per indossare il vestito eseguite un taglio al centro dietro e aggiungete un bottone per richiuderlo.
Il vestito è pronto, a questo punto ho aggiunto una ruche in fondo e una cinta decorativa.

How to make the ruffle:

how to make ruffles,ruffle tutorial
I then hemmed the ruffle and then gathered it: I stitched the edge of the ruffle loosely and then I pulled the thread. You'll see ruffles forming and you'll obtain this result
When you gather the fabric, it gets shorter so I cut 2 circles of fabric, one for the front and one for the back.
(I also gathered the shoulders)
Come si realizza la ruche:
Qui sopra troverete il modello per la ruche, una volta tagliato, eseguite l'orlo e poi arricciatelo. Per realizzare l'arricciatura basterà eseguire una filza lungo il bordo della ruche e poi tirare il filo, mentre la stoffa si arriccia vedrete diventare più evidenti le ruche. Arricciando la stoffa la lunghezza della ruche necessariamente si riduce; ho quindi tagliato due cerchi di stoffa, uno per la ruche sul davanti e una per la ruche sul dietro.
(Ho anche arricciato le spalle).


how to make ruffles,gathering technique,how to gathering

the ruffle sewed onto the dress
cucite la ruche sul vestito

How to make the belt: I cut a rectangle 10cm tall and 'hips width' long, I folded it in half and I sewed on the reverse and then I turned inside out. I then sewed onto the dress.

Come si realizza la cinta: Ho tagliato un rettangolo di stoffa della lunghezza dei fianchi e alto 10 centimetri. L'ho piegato a metà e ho realizzato la cucitura laterale a rovescio. Ho rivoltato la stoffa a dritto e ho cucito la cinta sul vestito.


How to make the bow: I cut another meter of fabric 10 cm tall, then I made the bow and I stitched it onto the dress.

Come si realizza il fiocco: ho tagliato un rettangolo di stoffa alto 10 cm e lungo un metro. Ho rifinito la striscia allo stesso modo della cinta. Ho eseguito un fiocco e l'ho cucito sul vestito.

et voilà! The dress is ready to wear!
Et voilà! Il vestito è pronto da indossare!