Christmas is approcching and we're putting together our
party outfit.
Last week we
diy-ed a our glitter shoes and now it's time to
diy our party dress.
The dress I made it's a
flapper dress in a blush pink color and I used a sheer crepe georgette fabric.
If you saw the latest runways you maybe know that the flapper dress will be really
trendy next
spring, so we're making a dress we can wear a lot next season. See the
step by step tutorial after the jump.
Natale si avvicina ed è tempo di mettere insieme il nostro
outfit. La settimana scorsa abbiamo
realizzato le scarpe, ora è il momento di cucire il
vestito che ho realizzato in stile
charleston scegliendo un colore rosa cipria. Se avete seguito le ultime sfilate saprete che i ruggenti anni venti stanno per tornare di gran moda la prossima primavera quindi il vestito di oggi è pronto per essere sfoggiato durante il corso della prossima stagione. Troverete il
tutorial step by step di seguito.
 |
| low waist flapper dresses for spring 2012: Alberta Ferretti, Etro, Roberto Cavalli, Gucci |
 |
The dress is basically a tube wide as your hips; the back is made a little smaller to obtain a slimming effect, sew the two rectangles at the sides and at the shoulders leaving opened the armholes and the neckline
Il vestito è in pratica un tubo della larghezza dei vostri fianchi, il dietro è tagliato più piccolo ottenendo un effetto snellente. Cucite i due rettangoli ai lati e sulle spalle lasciando aperte le maniche e lo scollo. |
 |
to wear the dress easily slash the back at the middle and add a button
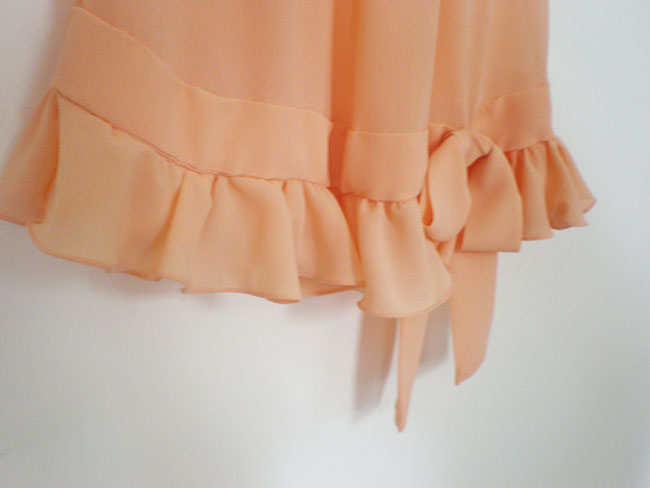
You've now made the dress. I then added a funny ruffle at the bottom and a decorative belt
Per indossare il vestito eseguite un taglio al centro dietro e aggiungete un bottone per richiuderlo. Il vestito è pronto, a questo punto ho aggiunto una ruche in fondo e una cinta decorativa. |
How to make the ruffle:
I then hemmed the ruffle and then gathered it: I stitched the edge of the ruffle loosely and then I pulled the thread. You'll see ruffles forming and you'll obtain this result
When you gather the fabric, it gets shorter so I cut 2 circles of fabric, one for the front and one for the back.
(I also gathered the shoulders)
Come si realizza la ruche:
Qui sopra troverete il modello per la ruche, una volta tagliato, eseguite l'orlo e poi arricciatelo. Per realizzare l'arricciatura basterà eseguire una filza lungo il bordo della ruche e poi tirare il filo, mentre la stoffa si arriccia vedrete diventare più evidenti le ruche. Arricciando la stoffa la lunghezza della ruche necessariamente si riduce; ho quindi tagliato due cerchi di stoffa, uno per la ruche sul davanti e una per la ruche sul dietro.
(Ho anche arricciato le spalle).
 |
the ruffle sewed onto the dress
cucite la ruche sul vestito |
How to make the belt: I cut a rectangle 10cm tall and 'hips width' long, I folded it in half and I sewed on the reverse and then I turned inside out. I then sewed onto the dress.
Come si realizza la cinta: Ho tagliato un rettangolo di stoffa della lunghezza dei fianchi e alto 10 centimetri. L'ho piegato a metà e ho realizzato la cucitura laterale a rovescio. Ho rivoltato la stoffa a dritto e ho cucito la cinta sul vestito.
How to make the bow: I cut another meter of fabric 10 cm tall, then I made the bow and I stitched it onto the dress.
Come si realizza il fiocco: ho tagliato un rettangolo di stoffa alto 10 cm e lungo un metro. Ho rifinito la striscia allo stesso modo della cinta. Ho eseguito un fiocco e l'ho cucito sul vestito.
et voilà! The dress is ready to wear!
Et voilà! Il vestito è pronto da indossare!