Showing posts with label sewing tutorial. Show all posts

Wednesday, July 18, 2012

How to sew a pair of pants : step by step guide revealed

how to, sewing project, pattern free project
DIY trousers - cut out asymmetric DIY shoes
Here's my newest sewing project and my new favorite pair of trousers. I like the strong contrast between the colors! I used black and white cotton of a similar weight. Want to make a pair like these? You have a few options
  1. Quick fix:Mix two pants find 2 pair of trousers in your closet with two colors that you would like to match (or find two discounted at sales even starting from $12); rip the seams, mix the front of one with the back of the other  and sew it back!
  2. Make yourself the pattern: take a pair of old trousers that fit you well and sacrifice them for the sake of fashion (just kidding!), rip the seams we'll use them as a pattern. You'll need the front and the back of one leg (front and back are different for good fit!). 
  3. Buy the pattern You can buy pant patterns with standard sizes online or find them on magazines. Burda magazine for example is a good resource.
 Now that you picked your option here's a few instructions on how to make a pair of pants

  1. Cut the fabric Double your white cotton fabric and cut along the shape of your front pattern; (leave some space for the seams) do the same with black cotton and the back of the of your patten. Now you should have 4 pieces 2 fronts and 2 backs.
  2.  Let's put the trousers together
  3. Sew each leg separately; put the front on the back and sew the inside seam and the outside seam of the leg
  4. Match the two legs together. Put one leg inside out and then insert the other leg (facing straight) in it. Sew the crotch seam from the front to the back
  5. Pants are almost done, did you remember to leave some space for a side zipper? If not open the left lateral seam for 10 cm or more and sew the the zipper in place.
  6. Adjust the lenght of the leg and finish your trousers with a hem at the bottom.

Sono l'ultimo paio di pantaloni che ho realizzato ma sono diventati rapidamente i miei preferiti. Penso che l'accostamento del bianco con il nero li renda una variante altrettanto versatile del pantalone nero . Ho utilizzato due stoffe in cotone dal peso simile. E voi avete mai realizzato un paio di pantaloni? Se volete realizzarne un paio simili a questi avete diverse opzioni:
  1. Barate  (scherzo!)  l'idea furba è quella di selezionatre 2 paia di pantaloni nel vostro armadio (o compratene due paia uguali di colori diversi ai saldi anche a  partire da 10 euro) scucirli e mischiare il davanti con il dietro e ricucirli
  2. Fate da sole il modello del pantalone Trovate un pantalone nell'armadio che vi calza a pennello (ma neanche troppo nuovo) e sacrificatelo in nome della moda! (esagerata!). Scucitelo e usatelo come modello  per un nuovo pantalone. Vi servirà il davanti e il dietro di una gamba (attenzione davanti e dietro sono sempre diversi per assicurare la giusta vestibilità).
  3. Comprate il modello Andate in edicola ed acquistate una rivista con i cartamodelli, Burda è un ottima scelta.
Ora che che avete il modello vi chiederete, ma come si cuciono i pantaloni?

  1. Tagliate la stoffa Piegate a  metà il cotone bianco (in questo caso) e stendeteci sopra il modello del davanti. Tagliate seguendo la forma lasciando dello spazio per effettuare la cucitura. Fate lo stesso con il cotone nero. Alla fine dovreste avere 4 pezzi: 2 davanti e 2 dietro
  2. Cuciamo il pantalone!
  3. Cucite ogni gamba separatamente: mettete il davanti sul dietro e cucite la cucitura esterna  e quella interna (dal cavallo fino in fondo)
  4. Mettete una gamba a rovescio e infilateci dentro l'altra gamba (a dritto). Ora la cucitura del cavallo combacia; cucite dal davanti fino al dietro.
  5. I pantaloni sono quasi finiti: scucite di circa dieci centimetri la cucitura laterale a sinistra e cuciteci una zip
  6. Terminate orlando i pantaloni.

    Sunday, December 18, 2011

    The flapper dress DIY

    flapper dress diy,diy,free pattern,tutorial

    flapper dress diy,diy,free pattern,tutorial
    flapper dress diy,diy,free pattern,tutorial

    Christmas is approcching and we're putting together our party outfit.
    Last week we diy-ed a our glitter shoes and now it's time to diy our party dress.
    The dress I made it's a flapper dress in a blush pink color and I used a sheer crepe georgette fabric.
    If you saw the latest runways you maybe know that the flapper dress will be really trendy next spring, so we're making a dress we can wear a lot next season. See the step by step tutorial after the jump.

     Natale si avvicina ed è tempo di mettere insieme il nostro outfit. La settimana scorsa abbiamo realizzato le scarpe, ora è il momento di cucire il vestito che ho realizzato in stile charleston scegliendo un colore rosa cipria. Se avete seguito le ultime sfilate saprete che i ruggenti anni venti stanno per tornare di gran moda la prossima primavera quindi il vestito di oggi è pronto per essere sfoggiato durante il corso della prossima stagione. Troverete il tutorial step by step di seguito. 


    spring 2012,flapper dress,gucci,etro,cavalli,alberta ferretti
    low waist flapper dresses for spring 2012: Alberta Ferretti, Etro, Roberto Cavalli, Gucci
    flapper dress pattern,flapper dress diy,diy,free pattern
    The dress is basically a tube wide as your hips; the back is made a little smaller to obtain a slimming effect, sew the two rectangles at the sides and at the shoulders leaving opened the armholes and the neckline
    Il vestito è in pratica un tubo della larghezza dei vostri fianchi, il dietro è tagliato più piccolo ottenendo un effetto snellente. Cucite i due rettangoli ai lati e sulle spalle lasciando aperte le maniche e  lo scollo.
    to wear the dress easily slash the back at the middle and add a button 
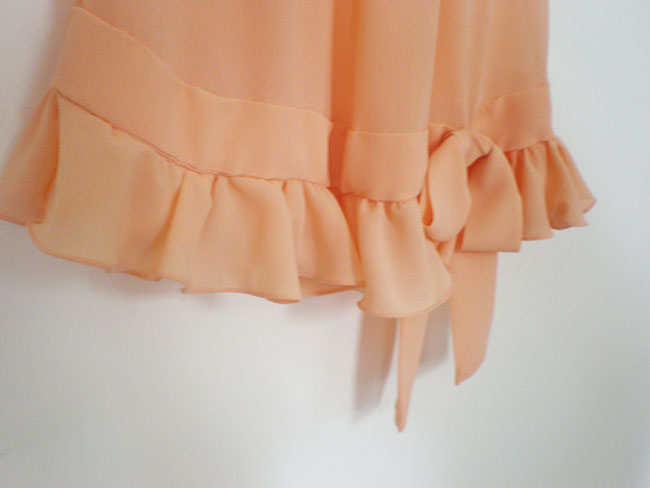
    You've now made the dress. I then added a funny ruffle at the bottom and a decorative belt
    Per indossare il vestito eseguite un taglio al centro dietro e aggiungete un bottone per richiuderlo.
    Il vestito è pronto, a questo punto ho aggiunto una ruche in fondo e una cinta decorativa.

    How to make the ruffle:

    how to make ruffles,ruffle tutorial
    I then hemmed the ruffle and then gathered it: I stitched the edge of the ruffle loosely and then I pulled the thread. You'll see ruffles forming and you'll obtain this result
    When you gather the fabric, it gets shorter so I cut 2 circles of fabric, one for the front and one for the back.
    (I also gathered the shoulders)
    Come si realizza la ruche:
    Qui sopra troverete il modello per la ruche, una volta tagliato, eseguite l'orlo e poi arricciatelo. Per realizzare l'arricciatura basterà eseguire una filza lungo il bordo della ruche e poi tirare il filo, mentre la stoffa si arriccia vedrete diventare più evidenti le ruche. Arricciando la stoffa la lunghezza della ruche necessariamente si riduce; ho quindi tagliato due cerchi di stoffa, uno per la ruche sul davanti e una per la ruche sul dietro.
    (Ho anche arricciato le spalle).


    how to make ruffles,gathering technique,how to gathering

    the ruffle sewed onto the dress
    cucite la ruche sul vestito

    How to make the belt: I cut a rectangle 10cm tall and 'hips width' long, I folded it in half and I sewed on the reverse and then I turned inside out. I then sewed onto the dress.

    Come si realizza la cinta: Ho tagliato un rettangolo di stoffa della lunghezza dei fianchi e alto 10 centimetri. L'ho piegato a metà e ho realizzato la cucitura laterale a rovescio. Ho rivoltato la stoffa a dritto e ho cucito la cinta sul vestito.


    How to make the bow: I cut another meter of fabric 10 cm tall, then I made the bow and I stitched it onto the dress.

    Come si realizza il fiocco: ho tagliato un rettangolo di stoffa alto 10 cm e lungo un metro. Ho rifinito la striscia allo stesso modo della cinta. Ho eseguito un fiocco e l'ho cucito sul vestito.

    et voilà! The dress is ready to wear!
    Et voilà! Il vestito è pronto da indossare!