Showing posts with label no sew. Show all posts

Thursday, February 23, 2012

DIY idea: Acne leather cut out skirt

acne,diy, fashion DIY,  skirt diy, diy leather skirt,cut out skirt, no sew, refashion, spring 2012,leather diy,acne s/s 2012
Acne spring 2012

acne,diy, fashion DIY,  skirt diy, diy leather skirt,cut out skirt, no sew, refashion, spring 2012,leather diy,acne s/s 2012
Acne spring 2012
It's an unusual leather skirt the one designed by Acne for spring summer 2012.  It can be made just cutting out star shapes from your leather skirt and no sewing is required. That's why leather is a fantastic diy material: it does not rip off!

E' una gonna originale quella disegnata da Acne per la primavera 2012. Può essere realizzata ritagliando delle stelle dalla vostra gonna in pelle. Non sarà necessario cucire nulla perchè la pelle non sfila e questo la rende una perfetta materia prima per i nostri fashion diy.

Tuesday, January 31, 2012

Vuitton inspired metal peter pan collar

fashion diy,diy,diy peter pan collar, peter pan collar, metal peter pan collar,vuitton peter pan collar, no sew,tutorial

Peter Pan collars are an irresistible DIY. There's only one collar out of our reach, the king of collars, the Vuitton metal peter pan collar. Impossible to DIY. without using metal? No, I found a way to make one similar using some quite strange items : felt, a blow dryer and mirror paper.
Felt it's a very interesting material because it becomes moldable when exposed to heat and keeps the shape when cool. We'll use the blow dryer to shape the felt.
The mirror paper it's a self adhesive stiff paper that looks like mirror, we'll use it to give the metal effect to our collar.
So grab the blow dryer and let's see how I made the collar.

I colletti Peter Pan sono un'irresistibile DIY. Solo uno era rimasto fuori dalla portata di noi ragazze, il re dei colletti, il colletto in metallo Vuitton. Impossibile da riprodurre senza utilizzare il metallo? Invece no, ecco come realizzarne uno simile utilizzando dei curiosi materiali : del feltro, della carta specchio e un phon.
Il feltro è un materiale molto interessante che diventa malleabile quando esposto al calore e mantiene la forma una volta raffreddato. Utilizzeremo quindi il phon per modellarlo. 
La carta specchio è un tipo di carta rigida e adesiva con la superficie riflettente, la useremo per creare l'illusione della superficile metallica.


This is what you need:
fashion diy,diy,diy peter pan collar, peter pan collar, metal peter pan collar,vuitton peter pan collar, no sew,tutorial
get the felt that is sold in stiff sheets or it won't keep the shape
Vi serviranno: un foglio di feltro rigido, un foglio di carta specchio, una cerniera, un phon, della colla
fashion diy,diy,diy peter pan collar, peter pan collar, metal peter pan collar,vuitton peter pan collar, no sew,tutorial
the inspiration Vuitton metal Peter Pan collar
fashion diy,diy,diy peter pan collar, peter pan collar, metal peter pan collar,vuitton peter pan collar, no sew,tutorial
get the pattern here: peter pan collar free pattern

scaricate il modello del colletto peter pan  ritagliate la forma in feltro e incollate la cerniera sul retro
fashion diy,diy,diy peter pan collar, peter pan collar, metal peter pan collar,vuitton peter pan collar, no sew,tutorial
when it's warm lift up the rounded edges and the inner border, let it cool for a second and see it keeping the shape

usate il phon per scaldare il feltro, appena sarà malleabile modellatelo con le mani: alzate il bordi esterni verso l'alto e il bordo interno all'infuori, dategli tridimensionalità
fashion diy,diy,diy peter pan collar, peter pan collar, metal peter pan collar,vuitton peter pan collar, no sew,tutorial
Usando il modello ritagliate la carta specchio
fashion diy,diy,diy peter pan collar, peter pan collar, metal peter pan collar,vuitton peter pan collar, no sew,tutorial
until you get the shape that you want.
To be sure that the felt will keep the shape forever spray it with a sealant.

Incollate la carta specchio sul colletto in feltro e continuate a scaldare il feltro fino ad ottenere la forma desiderata. Alla fine spruzzate con un fissante il feltro per essere sicure che non perda più la forma.

Wednesday, January 25, 2012

How to avoid the hem: the ankle slit

slit trousers,slit pants,ankle slit,trousers diy,hem diy,now sew,fashion diy
Asos Trousers with slit - denim trousers via man repeller

 The problem of having a pair of trousers that are too long often has an obvious solution: a shorter hem.
For those of you that find this practise boring or for those who are just  too creative to do what others do here's a different way to treat those pants: a front ankle slit. I'm advicing you to use scissors instead of neddle and thread. I like it because it somehow frames the shoes putting them under the spotlight.

Il problema di un paio di pantaloni troppo lunghi di solito trova un'ovvia soluzione : un orlo.
Per coloro che trovano noioso orlare i pantaloni o per coloro che sono troppo creativi per fare quello che fanno gli altri ecco un altro modo di risolvere il problema, aggirarlo se volete: prendete le forbici e aprite uno spacco sul davanti fino alla caviglia. L'effetto che otterrete è quello di incorniciare le scarpe mettendole in evidenza.

Wednesday, December 21, 2011

DIY idea: pom pon scarf

pom pon scarf,pom pon tutorial,pom pon diy,sandra backlund pom pon
colored pom pon scarf Accessorize - white pom pon scarf-top by Sandra Backlund

During these cold days the scarf is one key accessory we cannot live without. The pom pon scarf  is cute and can be easily made at home. Anyone can do pom pons, they're a quick , no sew diy project. If you like the multi colored one pictured above you can even make a new scarf recycling yarn leftover so you'll have a new scarf for free. 
Do you think a pom pon scarf is only suitable for kids? Have a look at the picture on the right where we see pom pons going high fashion in the scuptural white top by Sandra Backlund.
So bottom line: how do we make a pom pon?

how make pom pon,pom pon tutorial,pom pon diy
how to make a pom pon picture via fashion crochet
What do you need?
carboard
scissors
yarn
  1. cut two discs of cardboard 3 inches wide (the width sets the dimensions of the finished pom pon)
  2. overlap the two discs
  3. wrap the yarn around the discs until they're full (the more yarn you add the fuller the pom pon will be)
  4. use the scissors and cut all loops along the edges
  5. carefully separate the discs unveiling the center of the pom pon; cut another piece of yarn and knot  all the yarns together at the center
  6. remove the discs,  and you've done
After making several pom pons connect them using another piece of yarn and a needle, insert a pom pon after another and you've done!  
PS: the pom pon scarf can make a nice Christmas gift!


Durante le fredde giornate d'inverno la sciarpa è un accessorio di cui non possiamo fare a meno. La sciarpa con i pom pon è simpatica e può essere realizzata in casa. Tutti possono realizzare i pom pon, sono veloci e non richiedono alcuna cucitura. Se volete una sciarpa multicolore come quella di Accessorize potrete addirittura realizzarla riciclando gli avanzi di gomitoli che avete in casa ottenendo una nuova sciarpa completamente gratis. Se pensate che i pom pon siano adatti solo ai bambini ricredetevi guardando il top couture realizzato da Sandra Backlund. Allora, come si realizzano i pom pon?

Avete bisogno di:
cartone
forbici
lana

  1. ritagliate due dischi di cartone del diametro di 7 centimetri ( la dimensione dei dischi determinerà la dimensione finale dei pom pon)
  2. sovrapponete i due dischi
  3. avvolgete il filo intorno ai dischi fino a ricoprirli (più filo aggiungerete più pieni risulteranno i pom pon)
  4. usando le forbici ritagliate gli anelli di lana sul bordi dei dischi
  5. separate con cura i dischi scoprendo così il centro del pom pon;  tagliate un altro pezzo di filo e formate un nodo al centro bloccando tutti i fili insieme
  6. a questo punto rimuovete i dischi di cartone e il pom pon è fatto.
Dopo aver realizzato più pom pon connetteteli prendendo ago e filo e infilandoli uno dietro l'altro e la sciarpa è pronta!

PS: la sciarpa con i pom pon può essere un perfetto regalo di Natale!

Monday, July 4, 2011

Fashion DIY ideas starring the american flag


Today for the 4th of July anniversary we can craft something inspired by the american flag! I have to admit that both the american flag and the UK one are very fashionable,it will be too difficult to think dresses and accessories based on the italian flag: who thought that bright green and red could go along together? It's so obivious that our flag wasn't designed by a woman or a gay man,now i understand why men always choose blue and hardly move from that!
What diy projects we can do with the american flag? here's some ideas:

 some pieces of the flag cut and sewn over a pair of trousers


 the flag painted over a piece of cloth with fabric colors (available even as drawing pen)

 flag nails

Sewing lovers who may want to craft more difficult projects can use the flag as a fabric to craft tote bags or even shirts and blouses.


these last two pics are from tthe 2010 Zanotti collection "American flag",aren't these shoes amazing? I really want to try to diy them.

Saturday, April 30, 2011

DIY ideas for Gucci tassel belt

http://2.bp.blogspot.com/_Ft-n08M2lmA/TS9t6UZRKUI/AAAAAAAAASg/S5UwcDzN1uM/s1600/Gucci.jpg


Gucci tassel belt is one of the most sought after accessory of the season.
To copy the look you can just knot a curtain rope with tassels over a waist belt but if you're feeling crafty and want to own a belt like this one follow me.
This belt doesn't have any buckle and it's fastened with a rope that goes through loops and it's knotted on the front.
If we start with a regular belt we have to add loops to it.
Here's a couple of ways to make them starting from the easier.

guccibelthowtocopy.jpg
guccibelthowto2copy.jpg
now we have to make a tassel with a piece of leather
you just have to take a rectangular piece of leather or suede and slice it almost till the top and then fold it and glue it around the rope end.

Make_slits_large


These are some ideas on how to make this belt.
I'll make a step by step tutorial in the next few days, i just have to find a nice gold belt! :)
If you find this too complicated just go to the nearer H&M and get the belt below for £7.99,click here to see the item details.

https://blogger.googleusercontent.com/img/b/R29vZ2xl/AVvXsEhVyBH2KmmLmbbNWcMYQTNbgphItTgIp0YRpO7G8lV5Y3rsZp_BAZjbS-MFqF7Y7XOwqQ99Ce_o8YubQl2hIJ4B4DIs3M8qYpJkYKbWAELVQLbduYnGqKfPbj7Fz778_1a4cjDnXOYnQwY/s1600/DXLA55_81667_04000_96_4307.jpg


ehi, i just found another inspired belt, this time from asos check it here

:

Friday, April 22, 2011

Like a walking museum: wear paintings!


This is so good and different! This girl wears a silk skirt with a painting printed on it!
And guess what? It can easily copied looking at yesterday post on knotting scarves.
I'll tell you how. As we said scarves come in a variety of patterns and i've seen many times paintings printed on them (usually you can find these types of scarves in museum souvenirs shops).
So first thing buy these scaves with a famous painting of your choice,then an Hermes card comes handy:
https://blogger.googleusercontent.com/img/b/R29vZ2xl/AVvXsEi4_h5HRPSdZ58VxQyRwIxS_q8wunJ7G2gbEw21lk7h2J9wQ_sFLnK32F0hRGzath_UmrhzUEfz72DPncNiA_5IZd3otuXlhCZxfxTmhDyB_qJIra4MBLFYQyTdo17f2xvTIfPgdFpo967K/s1600/mini+jupe.jpg
Hermes knotting card

and the skirt is done.Want to do something more refined?Then use scarves as they were fabric!
Super easy too:just put the 2 scarves one onto the other and sew them at the sides obtaining a tube (pay attention at the width of the tube, your hips have to fit in it!) now add an elastic at the waist and the skirt is done!
A skirt like this will be very unique,definitely you'll get the head turn effect!

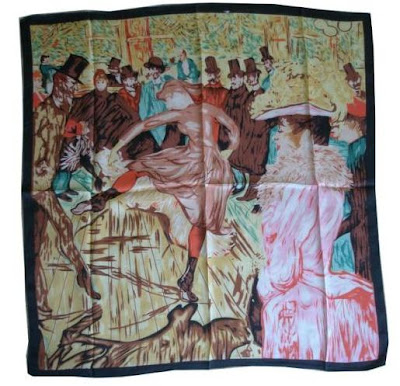
examples of famous paintings printed on scarves

Wanna see other clothes with paintings on? go here


Com'è originale questo look! Nella foto la ragazza indossa una gonna di seta con un quadro stampato.La cosa più interessante è che possiamo copiare il suo look rileggendo i suggerimenti del post di ieri.
Come abbiamo già detto i foulard vengono stampati con molte fantasie, tra queste anche i quadri famosi! Foulard del genere sono facili da trovare nei negozi di souvenir dei musei.
Ed è qui che i consigli di Hermes ci vengono in aiuto:comprate un paio di questi foulard con il quadro che vi piace,guardate la figurina di Hermes dove un foulard viene legato dietro la schiena e uno davanti e la gonna è fatta!
Se volete un risultato più rifinito potete sempre utilizzare i foulard al posto della stoffa!
Mettetene uno sopra l'altro e cucite lateralmente i bordi ottenendo un tubo (fate attenzione che sia abbastanza largo per farci passare i fianchi) poi aggiungete un elastico in vita ed il gioco è fatto!
Otterrete una gonna unica che sicuramente vi renderà oggetto dell'attenzione dei passanti!
Volete vedere altri capi con quadri stampati? Cliccate qui!

Thursday, April 21, 2011

DIY inspiration: the scarf top

hermesscarf2.jpghermesscarf2-A.jpg
hermesscarf1.jpghermesscarf1-A.jpg
hermesscarf3.jpghermesscarf3-A.jpg

hermesscarf5.jpghermesscarf5-A.jpg

hermesscarf4.jpghermesscarf4-A.jpg

Hermes scarves are beautiful but very expensive. The maison started to produce these cards to show customers why their foulards are worth a buy:because they can be easily turned in a variety of clothes.
This spring is all about prints so scarves with their bold colors and patterns can make a fantastic top or accessory.
Try these easy folding and knotting tecniques and make your own top!
Now click here if you want to know how to make a bag out of a scarf.


I foulard di Hermes sono bellissimi ma decisamente costosi. Forse per convincere i potenziali consumatori all'acquisto Hermes ha cominciato a stampare questi cartoncini che mostano come con poche semplici mosse si possono ottenere top o accessori a partire dai loro famosi foulard.
Questa primavera le stampe colorate sono un must quindi i foulard, disponibili nelle fantasie più sgargianti, sono un ottimo modo di ottenere un top alla moda!
Provate anche voi!
Ora se volete vedere come ottenere una borsetta da un foulard cliccate pure qui!