Showing posts with label skirt diy. Show all posts

Wednesday, July 11, 2012

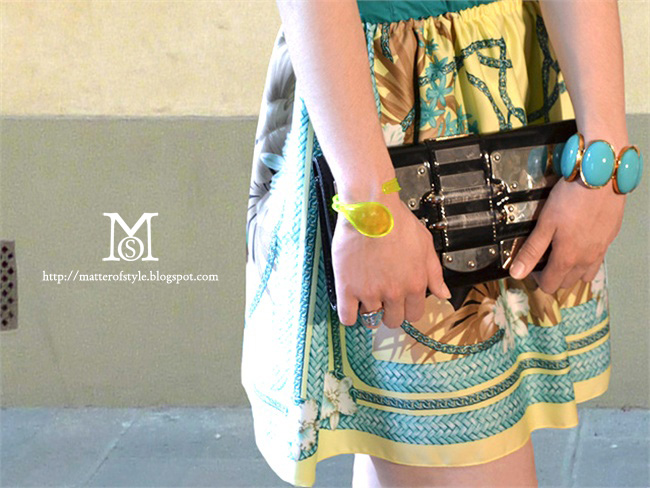
How to turn a scarf into a skirt in less than 1 hour

1 hour skirt, DIY, easy skirt tutorial, how to transform a scarf, how to turn a scarf into a skirt no pattern, scarf skirt diy, skirt diy, skirt pattern, tutorial,
scarf skirt DIY
1 hour skirt, DIY, easy skirt tutorial, how to transform a scarf, how to turn a scarf into a skirt, MY DIY, no pattern, scarf skirt diy, skirt diy, skirt pattern, tutorial,
scarf skirt tutorial
Today I would like to show you how to transform a scarf into a fun summer skirt in less than an hour (see also how to transform a scarf into a dress).
Scarfs come in a variety of colors and prints (I got this one at H&M and it's approximately 90x90 cms) and can be worn around the head as a turban or around the waist as a belt but from now on they can be your favorite silk skirt.


Oggi vi mostrerò come trasformare un foulard in una gonna in meno di un'ora (vedi anche come trasformare un foulard in un vestito). Troverete in commercio foulard dalle fantasie più varie e colorate che diventeranno una stoffa unica per realizzare la vostra nuova gonna in seta (il foulard in alto è di H&M circa 90x90cm). Cliccate qui per guardare il tutorial completo.

Saturday, April 7, 2012

The Peplum skirt DIY

diy, fashion DIY,  skirt diy, gonna tulipano, volant,cucire,cloth diy, peplum skirt diy,  how to, tutorial, peplum skirt, s/s 2012, spring summer 2012,sew
Peplum skirt DIY Tutorial
spring summer 2012 trends,spring 2012 trends,peplum skirt,fashion shows 2012,runway
The peplum skirt on s/s 2012 runways via howtobetrendy

Today I would like to show you how make a peplum skirt. We'll transform a classic pencil skirt into an up-to-date super feminine peplum. This retro look will enhance your curves creating the illusion of a smaller waist and wider hips. Peplums are very popular right now in every form, this tutorial can also be used to make peplum tops and dresses.


Oggi vi mostrerò come realizzare una gonna a tulipano. Trasformeremo la classica gonna dritta in una  più femminile e alla moda. L'aggiunta del volant vi donerà l'effetto di una vita più stretta e di fianchi più generosi. Il look tulipano è oggi molto popolare, questo tutorial può essere utilizzato anche per aggiungere volant a top o vestiti.

Con un metro da sarta misurate la vita della gonna
I cut the circle at the back because my zipper was there, you can cut it at one side if your zipper is there.
Dividete il numero per 6.28 ottenendo così la misura del raggio R. Disegnate una circonferenza di raggio R. Aggiungete 20 cm ad R e disegnate un'altra circonferenza concentrica. Ritagliate il cerchio di stoffa.


Starting from the center pin the circle on the skirt. Make sure the open side goes close to the zipper so you can still use it. When everything is ok sew the peplum onto the skirt.

Cominciando dal centro appuntate la stoffa sulla gonna con degli spilli. Tagliate la stoffa in corrispondenza della zip. Potrete così continuare ad usarla senza problemi. Infine cucite la stoffa sulla gonna. Voilà!

Tuesday, April 3, 2012

Doily lace skirt DIY

cloth diy, lace skirt diy, louis vuitton, lace,doily lace,lace trend,dolce gabbana, spring 2012,  s/s 2012, lace trim, pink skirt, skirt diy, fashion DIY, tutorial
Lace skirt DIY - flower hair pins H&M - brass flower comb H&M -
cloth diy, lace skirt diy, louis vuitton, lace,doily lace,lace trend,dolce gabbana, spring 2012,  s/s 2012, lace trim, pink skirt, skirt diy, fashion DIY, tutorial
The inspiration s/s 2012 collections from left: Vuitton - Erdem - Preen - Oscar de la Renta -  pic via Fashionologie

If you flip through the pages of a fashion magazine in these days you may have noticed there's a lot of lace going on. I couldn't resist this super feminine trend so today I'll show you how I made my own lace skirt. You'll need
  • a skirt 
  • lace trim (sold in yards)
I chose to apply white lace onto a pink skirt to exalt it. Doesn't this skirt look like made of sugar?
Follow me after the jump for the tutorial.

Sfogliando le riviste di moda in questi giorni avrete notato l'onnipresenza del pizzo! Chi può resistere ad un look così femminile? Oggi vi mostrerò come ho realizzato la mia nuova gonna in pizzo. Vi serviranno:
  • una gonna
  • una striscia di pizzo a metraggio
Scegliete il pizzo di un colore diverso dalla gonna per metterlo in evidenza.
Seguitemi per il tutorial.


I chose to use a wide lace trim and I found it in a lace curtain with repeated design.
Ho deciso di utilizzare una striscia in pizzo alta e ben visibile e l'ho trovata in una tenda con un motivo ripetitivo


I cut the curtain into bands
Ho ricavato le striscie ritagliando la tenda.


I then pinned the lace band onto the skirt. You can now make a straight seam to sew the lace on the skirt.
Appuntate con degli spilli la striscia in pizzo sulla gonna e poi eseguite una cucitura per fissarlo.

Repeat the process until the skirt is fully covered. 
Ripetete il procedimento fino a ricoprire completamente la gonna.
cloth diy, lace skirt diy, louis vuitton, lace,doily lace,lace trend,dolce gabbana, spring 2012,  s/s 2012, lace trim, pink skirt, skirt diy, fashion DIY, tutorial
now finished.

Thursday, February 23, 2012

DIY idea: Acne leather cut out skirt

acne,diy, fashion DIY,  skirt diy, diy leather skirt,cut out skirt, no sew, refashion, spring 2012,leather diy,acne s/s 2012
Acne spring 2012

acne,diy, fashion DIY,  skirt diy, diy leather skirt,cut out skirt, no sew, refashion, spring 2012,leather diy,acne s/s 2012
Acne spring 2012
It's an unusual leather skirt the one designed by Acne for spring summer 2012.  It can be made just cutting out star shapes from your leather skirt and no sewing is required. That's why leather is a fantastic diy material: it does not rip off!

E' una gonna originale quella disegnata da Acne per la primavera 2012. Può essere realizzata ritagliando delle stelle dalla vostra gonna in pelle. Non sarà necessario cucire nulla perchè la pelle non sfila e questo la rende una perfetta materia prima per i nostri fashion diy.

Tuesday, January 10, 2012

Wrap sequin skirt with rounded hem DIY

alexander wang skirt diy,wrap skirt diy,wrap skirt tutorial,free sewing pattern,sewing tutorial,sequin skirt,skirt diy
wrap skirt diy,wrap skirt tutorial,free sewing pattern,sewing tutorial,sequin skirt

The sequin fabric I used to make the Peter Pan collar was just too cute and I had to use it again so I made this sequin wrap skirt with a rounded hem. Since sequins on this particular fabric are stitched on tulle I also lined it in pink. I hope you'll enjoy this DIY. If you like to wear sequins click to read my tips to wear sequins.
See how I made it!

Ho usato la stessa stoffa in paillettes del colletto Peter Pan per realizzare questa gonna a portafoglio con l'orlo arrotondato. Vediamo come l'ho realizzata e se amate indossare le pailettes cliccate per leggere i miei consigli su come indossare le paillettes.


You'll need a rectangle piece of fabric "skirt lenght" tall and "1,5 x hip width" wide.
Vi servirà un rettangolo di stoffa alto quanto la lunghezza della gonna e largo 1,5 volte la larghezza fianchi.


Piegate la stoffa a metà e ritagliate il profilo arrotondato
This is how the skirt looks like once lined
Visto che le mie paillettes sono cucite su tulle ho foderato la gonna.
Open your rectangle now 
Aprite il vostro rettangolo
Fold one side
Ripiegate un lato
Now the other. Pay attention: the intersection of the two sides, the rounded hem, must be at the middle.
Poi l'altro. Fate attenzione che l'orlo arrotondato cada al centro. Cucite come indicato.

Cucite un elastico sul dietro della gonna assicurando un fitting perfetto intorno alla vita!

If you liked this post click to see other DIYs cloths 
Se vi è piaciuto questo post cliccate per leggerne altri: Vestiti DIY

Tuesday, November 22, 2011

The pleated skirt DIY


I love everything metallic right know. Either if you're going to spend the party season between  social events or with your friends and family there is only one rule to obey: sparkle! I start putting some glitters in my wardrobe with this skirt I made, a pleated one. It doesn't require any pattern; I hope you'll like this tutorial I made for you.

Sia che passiate la stagione natalizia tra eventi mondani o con famiglia ed amici c'è una sola regola da osservare quest'anno: brillare. Io ho cominciato ad aggiungere lustini nel mio guardaroba con questa gonna che ho realizzato. Si può realizzare senza modello, spero che vi piaccia il tutorial che ho confezionato per voi.
 

https://blogger.googleusercontent.com/img/b/R29vZ2xl/AVvXsEhbH4TdIrpW1yY5D2tlDIssbTqcXUPBDCBSZvtmxLtDd4LH0H5GaUsqwFqWe43l9EPqR2HV9b6RkTyf3-zYQjnUzyj31sV_Kf5DgU0CYegnJ1XfPR_iiiyeSkoPlJZsWERbN-IT4CJqINs/s1600/inspiration.jpg
the inspiration


the "pattern"

 You'll need:
1 long rectangle of fabric to make pleats 
1 short rectangle of fabric to make the belt
an elastic band 

Vi serviranno:
1 rettangolo di stoffa lungo per la gonna a pieghe
1 rettangolo di stoffa basso per la cinta
un elastico

To make this skirt I chose a gold lame fabric. You have to cut a rectangular piece of fabric 3 times longer than your hips cincumference. The height of the rectangle is the skirt height (you choose it),leave a little extra lenght to make hems. Cut your piece of fabric and hem it at the bottom.
We'll need another rectangle of fabric that will become the skirt belt. We'll insert an elastic band into the belt to obtain a perfect fit.

Per realizzare questa gonna ho scelto una stoffa dorata in lamè (si può trovare in merceria in vari colori) da cui ricaverete un rettangolo lungo 3 volte la circonferenza fianchi. L'altezza del rettangolo è invece la lunghezza della gonna,sceglietela a piacere,contate un margine per gli orli. Tagliate il rettangolo e orlatelo sul fondo.
Un altro rettangolo ci servirà poi per realizzare la cinta della gonna in cui inseriremo un elastico ottenendo così il fitting desiderato.


In order to make the pleats pinch and fold the fabric
Make every pleat 3 cm wide
Check the top and the bottom of your rectangle and make sure the pleats width is the same on both sides

Per ottenere le pieghe sollevate la stoffa e piegatela. Realizzate pieghe larghe 3 cm.
Controllate che sopra e sotto che siano della stessa larghezza.
Fasten pleats with pins so they won't move.
Baste the pleats and then sew them at the top. 

Fermate le pieghe con degli spilli in modo che non si muovano.
Imbastite le pieghe e poi eseguite la cucitura in vita per fermarle.
 
The skirt is almost done.
Let's make the belt.
Cut a rectangular piece of fabric long as your hips circumference. Its height is up to you and depends on how tall you want to make the belt. For example to make it 3 cms tall, make the rectangle 6 cms tall plus a little extra for hems.

La gonna è quasi fatta.
Realizziamo la cinta.
Tagliate un rettangolo di stoffa lungo quanto la circonferenza fianchi . L'altezza del rettangolo dipende quanto volete che sia alta la cinta. Se volete una cinta alta 3 cm l'altezza del rettangolo deve il doppio. Ricordatevi di lasciare un bordino per gli orli.

Reverse the rectangular piece of fabric and pin it over the top of the skirt then sew it.

Mettete la striscia a rovescio e appuntatela sopra la gonna (a dritto); poi cucitela sul bordo della gonna.

 Turn over the skirt and hem the rectangle.

Mettete la gonna a rovescio e orlate il rettangolo.

Fold the rectangle over and sew it on the skirt.
You've now obtained a horizontal pocket where you can insert the elastic band. Attach a big safety pin to the band,it will help you inserting it into the belt.
Cut the elastic band a little shorter than your low waistline. Sew the elastic band ends together.

Piegate il rettangolo a metà e cucitelo sulla gonna.
Abbiamo così ottenuto una "tasca" in cui inserire l'elastico. Appuntate una spilla da balia grande sull'elastico e cominciate ad infilarlo. La spilla vi aiuterà a completare velocemente l'operazione, poi rimuovetela. Tagliate l'elastico un po' più corto della vostra circonferenza alla "vita bassa". Cucite gli estremi dell'elastico insieme.

Now it's time to close the skirt. Fold in half your rectangle and make a lateral seam and you've done!
 I hope you enjoyed this little tutorial, share your thoughts and advices :) sorridente.

E' ora il momento di completare la gonna. Piegate il rettangolo a metà a rovescio ed eseguite una cucitura laterale per chiudere la gonna. Et voilà!
Spero che il tutorial vi sia piaciuto; se avete dei consigli da condividere sono bene accetti :) sorridente.

Friday, April 22, 2011

Like a walking museum: wear paintings!


This is so good and different! This girl wears a silk skirt with a painting printed on it!
And guess what? It can easily copied looking at yesterday post on knotting scarves.
I'll tell you how. As we said scarves come in a variety of patterns and i've seen many times paintings printed on them (usually you can find these types of scarves in museum souvenirs shops).
So first thing buy these scaves with a famous painting of your choice,then an Hermes card comes handy:
https://blogger.googleusercontent.com/img/b/R29vZ2xl/AVvXsEi4_h5HRPSdZ58VxQyRwIxS_q8wunJ7G2gbEw21lk7h2J9wQ_sFLnK32F0hRGzath_UmrhzUEfz72DPncNiA_5IZd3otuXlhCZxfxTmhDyB_qJIra4MBLFYQyTdo17f2xvTIfPgdFpo967K/s1600/mini+jupe.jpg
Hermes knotting card

and the skirt is done.Want to do something more refined?Then use scarves as they were fabric!
Super easy too:just put the 2 scarves one onto the other and sew them at the sides obtaining a tube (pay attention at the width of the tube, your hips have to fit in it!) now add an elastic at the waist and the skirt is done!
A skirt like this will be very unique,definitely you'll get the head turn effect!

examples of famous paintings printed on scarves

Wanna see other clothes with paintings on? go here


Com'è originale questo look! Nella foto la ragazza indossa una gonna di seta con un quadro stampato.La cosa più interessante è che possiamo copiare il suo look rileggendo i suggerimenti del post di ieri.
Come abbiamo già detto i foulard vengono stampati con molte fantasie, tra queste anche i quadri famosi! Foulard del genere sono facili da trovare nei negozi di souvenir dei musei.
Ed è qui che i consigli di Hermes ci vengono in aiuto:comprate un paio di questi foulard con il quadro che vi piace,guardate la figurina di Hermes dove un foulard viene legato dietro la schiena e uno davanti e la gonna è fatta!
Se volete un risultato più rifinito potete sempre utilizzare i foulard al posto della stoffa!
Mettetene uno sopra l'altro e cucite lateralmente i bordi ottenendo un tubo (fate attenzione che sia abbastanza largo per farci passare i fianchi) poi aggiungete un elastico in vita ed il gioco è fatto!
Otterrete una gonna unica che sicuramente vi renderà oggetto dell'attenzione dei passanti!
Volete vedere altri capi con quadri stampati? Cliccate qui!