Showing posts with label studs diy. Show all posts

Monday, September 10, 2012

Show your bad girl glam : make a punk studded headband

punk, studded headband, studs,studded diy, fashion diy
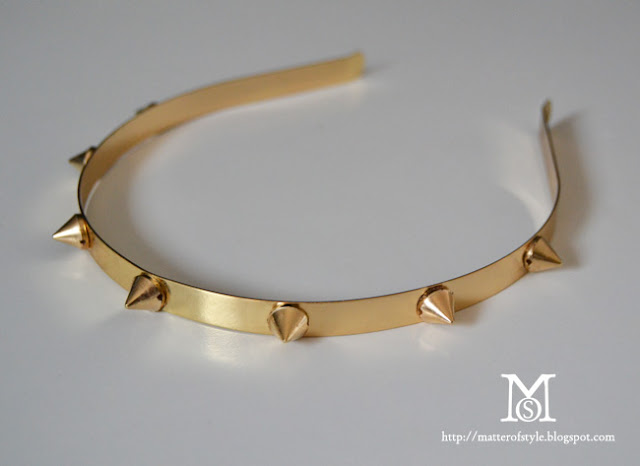
DIY studded headband

 Bad girls are always glamourous. If your style is glam rock this headband is thought to bring a touch of aggressiveness in your everyday look while remaining chic. Try to wear this studded headband with a boucle, chanelesque jacket and a pair of black thight jeans.

This is a very quick diy and I'm going to insert it in a new diy category you can now browse from the navigation bar under the title called 10 minutes DIY.
It collects all my diy tutorials that can be completed quickly so you don't have to wait to wear your new diy must have!

To make this spiky headband you'll need:
  • gold metallic headband 1 cm wide (this one is from H&M)
  • cone stud beads (yes they're beads! they can be sewed or glued)
  • glue

 Kate Moss ci insegna: le bad girls hanno sempre il loro fascino. Per voi che amate lo stile glam rock e non volete rinunciare ad un tocco di aggressività anche nel look di tutti i giorni oggi vi mostrerò un tutorial per realizzare un cerchietto decorato con le borchie. Provate ad indossarlo con una giacca di ispirazione Chanel e un paio di skinny jeans neri. 
Questo è un tutorial davvero veloce che inserirò in una nuova categoria chiamata 10 minutes DIY. La trovate nella barra di navigazione sotto al titolo e raccoglierà tutti i tutorial che possono essere completati velocemente, così non dovrete aspettare per indossare il vostro nuovo must have fai da te!

Per realizzare il cerchietto avete bisogno di:
  • un cerchietto di metallo (trovato a H&M)
  • perline a forma di borchia (eh si sono delle perline, si possono cucire o incollare, la versione più comoda delle borchie che si sia mai vista! Cercatele online)
  • colla

    Put some glue behind the stud cone beads
     Versate una goccia di colla sul retro delle perline

    then glue them onto the headband.
    Start from the centre and glue one stud,
    then glue 3 studs on each side 
    at a distance of 3cm from each other.

    e incollatele sul cerchietto metallico.
    Partendo dal centro, incollate una borchia.
    Aggiungetene 3 per lato distanziate circa 3 cm l'una dall'altra.

    Wednesday, August 1, 2012

    Inspired by McQueen: De Manta clutch DIY

    diy, fashion diy, mcqueen diy, bag diy,studded bag diy,
    McQueen inspired clutch DIY  - floating claw ring DIY
     diy, fashion diy, mcqueen diy, bag diy,studded bag diy,
    alexander mcqueen de manta clutch
    McQueen De manta clutch

    Some years ago animal prints were sinonymous of an eccentric style. Nowadays leopard prints are a must have for women of any age. I would like to suggest you go deeper in the jungle and get inspired by python prints. These exotic leathers are sinonymous of luxe and exclusivity (and painful prices) so you have to get yourself a snakeskin accessory chic girl!
    Today I'll show how to make a snakeskin clutch with a placemat found at zara home. You can find placemats of any material. If you don't find the one you like you can replace it with a piece of vinyl or leather 35x50 cm.
    We'll give a full trasformation to the placemat. For the shape of the clutch I took inspiration from Alexander McQueen  de manta clutch

    For the Clutch you'll need:
    • a placemat (or a 50x35 cm piece of leather)
    • 28 pyramid studs
    • 2 zippers 14cm each
    • 2 automatic buttons 
    • glue
    Let's get started


    straw bag DIY
    When you've done have a look to another summer bag you can make with placemats   ------->

    Tuesday, May 15, 2012

    10 popular ways to use studs in a DIY


    studded iphone cover, studded diy, studs diy
    BUY or DIY studded iphone case

    studded bra
    studded bra
    studded collar

    studded shoes
    studded heels by Louise Goldin for Topshop

    studded loafers
    hellraiser flats
    studded converse
    studded biker jacket
    well studs are meant to stay with a motorcycle jacket - Burberry Prorsum spring 2011
    studded cuff
    studded jewelry DIY

    studded leggings

    studded clutch, studded bag


    Studs are a diyer best friend. There are tons of things you can customize successfully with a few studs. They are easy to insert and the result you get is always an edgy accessory with a rock feeling.


    How to insert studs:
    • get the item you want to customize with studs
    • use  a pen to mark the spots where you will insert studs
    • use scissors to pierce the material
    • insert the studs
    • block them in place (depending on the type of studs you're using either close their teeth or screw them)
    There are 3 common types of studs in the market;

    you'll use
    • flat back (tiny studs or glue on) to customize lightweighted cloths and everytime you cannot access to the back of the item you customize
    • nailhead studs for medium weighted fabrics and leather
    • screw back studs for thick leather
    flat back - nail head - screw back studs

    Ogni capo acquista un nuovo appeal se viene decorato con le borchie. Dopo aver imparato cad inserirle potrete ottenere in pochi minuti un  capo o un accessorio personalizzato e sempre alla moda destinato ad attirare l'attenzione di tutti.

    Come si inseriscono le borchie:
    1. Con una penna segnate i punti dove andrete ad inserire le borchie
    2. utilizzate le forbici o un punteruolo per forare il capo che volete decorare
    3. inserite le borchie
    4. bloccate le borchie in posizione chiudendo le alette sul retro
    Troverete sul mercato 3 tipi di borchie:
    1. piatte che possono essere incollate sul capo, le userete per stoffe leggere o ogni qual volta non potete avere accesso al retro dell'oggetto da personalizzare
    2.  chiodate per tessuti e pellame di medio spessore
    3. a vite per il pellame più spesso.

    Friday, April 8, 2011

    DIY inspiration:on-off zipped sleeves


    I love this jacket! One jacket two souls.Plain classic front with super studded sleeves.
    Do you have a job interview after a rock concert?You just unzip sleeves and go.
    I can't wait to try it.
    These kind of clothing are versatile,they can be adapted according to the situation.You don't need a leather jacket and a leather waistcoat,you get both in one cloth.
    Zippers are a fantastic way to add functionality to a cloth,for example to transform a dress from day to night add a zipper to your knee-lenght day dress at the mini skirt height.After a day of work, you unzip that band of fabric at the bottom and you obtain a mini dress for the night without going at home to change your outfit!
    Go here to see a full zipper dress diy.

    Saturday, March 12, 2011

    DIY inspiration:safety pins


    https://lh4.googleusercontent.com/-BR0rPxYcVqI/TXAPC8LcBCI/AAAAAAAACvk/brCV4aG5iTQ/s1600/174925_980.jpg

    Balmain
    Safety Pin WingsSafety-pin collar jacket
    Look at the wonderful jacket by Balmain.
    It is totally covered with studs in different shapes but there's also another kind of hardware on it.
    The decoration includes safety pins inserted in eyelets.
    Don't you think they do a pretty good job as decoration?
    It's a way to re-evaluate something cheap and considered only as a tool.
    The pictures above can give you some inspiration on how to decorate clothes with pins.
    1. put safety pins between two points of fabric separated by a seam It will look like the fabric is kept together with the pins
    2. use pins as they were beads,use them to make a drawing.Draw a shape with a chalk over your cloth and then fill it with pins.You don't even need to sew!
    3. use pins to decorate borders

    Guardate la bellissima giacca firmata Balmain,tutta decorata con borchie di diverse forme. Salta all'occhio anche un altro tipo di decorazione ottenuta con delle spille da balia infilate tra un occhiello e l'altro.
    E' il momento di guardare con occhi diversi la spilla da balia.
    Qualche suggerimento per personalizzare il vostro capo
    1. appuntate delle spille tra 2 pezzi di stoffa separati da una cucitura,sembrerà che il capo sia tenuto insieme dalle spille
    2. utilizzate le spille per fare un disegno:stilizzate una forma con un gessetto sul capo e poi riempitela di spille,dovete semplicemente appuntarle,non bisogna neanche cucire!
    3. utilizzate tante spille per decorare i bordi dei capi

    Monday, March 7, 2011

    DIY inspiration:studded corset


    There's a lot going on here.
    Even though this is not what caught my eye,with this dress if lights switch off you have your pocket torch embedded.
    The accessorry i'm in love with is the studded corset worn over this dress.
    I like it because it's just the structure,the idea of a corset.
    As you can see worn over an elegant dress gives some character to it.

    Corset and cage dresses are made with stiff plastic bones but there's something that can maybe come handy to make this look.
    I'm talking about rigilene, a rigid band sold by yard that could be easily sewn and studded.
    It can be an easier to handle version of steel and plastic boning.